This help page is for version 8.4. The latest available help is for version 9.4.
Controlling Remote Access
To control which users can use a Remote Console to connect to the Central Monitoring Service, go to Settings -> Remote Access.
This must be done from the Console installed on the Central Monitoring Service.
When you initially open the Remote Access Control window, it looks like the image below.
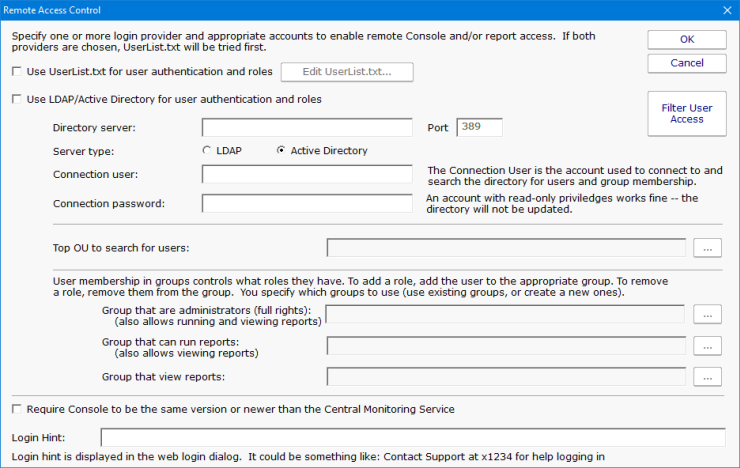
Remote Access allows you to specify lists of users that can run Remote Consoles, and also which users can login and view reports if they are protected.
You can specify a user list via simple text file, or via Active Directory or LDAP groups. When logins are checked, the UserList.txt file is checked first, and then
the LDAP or Active Directory server.
Once you have specified which users can login here, you can go to Filter User Access to further restrict some logins to just particular groups of
servers. This is particularly useful in a Managed Service Provider setting where you want to give customers access to see their own server status reports.
UserList.txt Users
The easiest way to specify users is via the UserList.txt file. This is a simple text file which contains comments on how to enter new users. It's quite easy:
# This is the default UserList.txt file
# Users are specified using the format shown below:
# [Users]
# {username}={password},{role}
#
# Passwords ARE case sensitive, username is not. Don't use a comma in
# the password itself.
# Role is a value shown below:
# A - administrator - full rights to configure the system (implies R and V)
# R - run reports (implies V)
# V - view existing reports (via Console or web browser)
#
# So an example file might look like:
#
# [Users]
# dan=S3cr3tP@assw0rd,A
# jon=m1ghym0us3,R
# philip=w@tch,V
#
# Extra space or tab characters will be removed when the file is processed
[Users]
doug=test16,A
quinn=h@ryp077er,A
john=l33tr,A
henry=5891sda,A
bob=239ska,R
In the example above, user Quinn would be able to login to a Remote Console or a password protected report page using password h@ryp077er.
Active Directory Users
PA Server Monitor can also refer to Active Directory groups to specify user logins.
- First, specify an Active Directory or LDAP server and its port. The default LDAP port is 389.
- Indicate whether the server is LDAP or Active Directory.
- Specify a username and password for an account that can connect to and search the directory. This will be used to check group membership. This account does not
need any write rights to the directory.
Every few seconds the server settings and account credentials are checked. Once good credentials have been entered, the rest of the dialog will be enabled automatically.
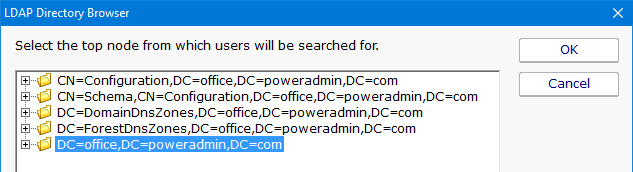
- Click the ... button next to Top OU to search for users. If nothing happens, the credentials are not allowing access to the LDAP or Active Directory server.
If the credentials are good, an LDAP Browser dialog will appear. Choose the top OU where the user accounts exist.
- Choose three groups whose members will have Administrator, Run Report and View Report rights respectively. If a user is in multiple groups, they get the rights of the
highest group they are in.
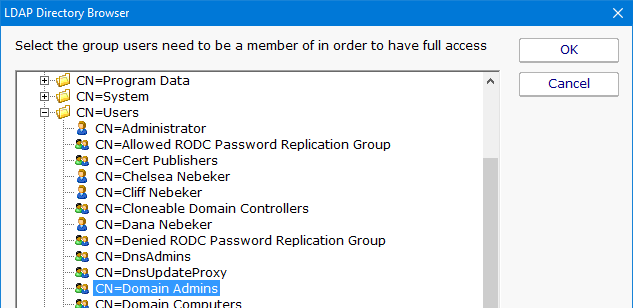
Not all groups have to be specified as shown below.
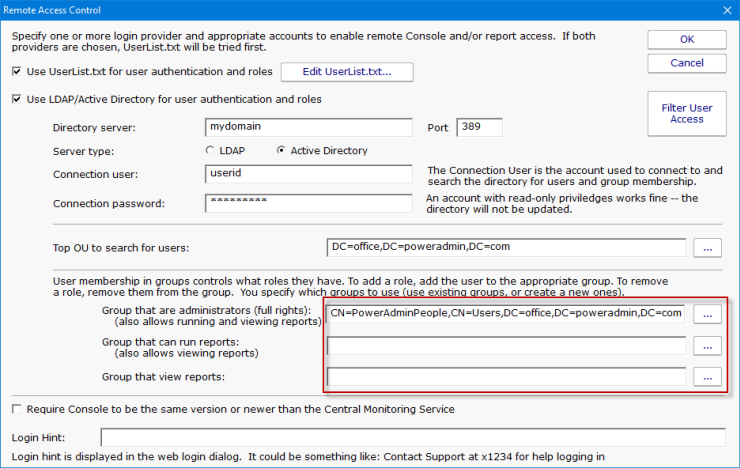
- Press OK to finish. The monitoring service does not need to be restarted for these changes to take effect.