
Did you know that you could configure PA Server Monitor’s Event Log Monitor feature to monitor one or more of your event logs? The event logs can include standard application, security, and system logs, as well as any custom event logs you want to monitor. With our server monitoring software, you have complete control and flexibility over the types of events you want to monitor.
Step 1: Right-click on the server to which you want to add a new event log and select “Add New Monitor.”
In the box that opens, scroll down until you see “Event Log Monitor.” Click on it, and then click the “OK” button.
Step 2: Configure the Event Log Monitor you are creating.
In the menu, you will see several things. First off, you will notice all the event sources and event logs that are on the server will appear and show you the default settings. You can accept the default settings or create a custom monitor.
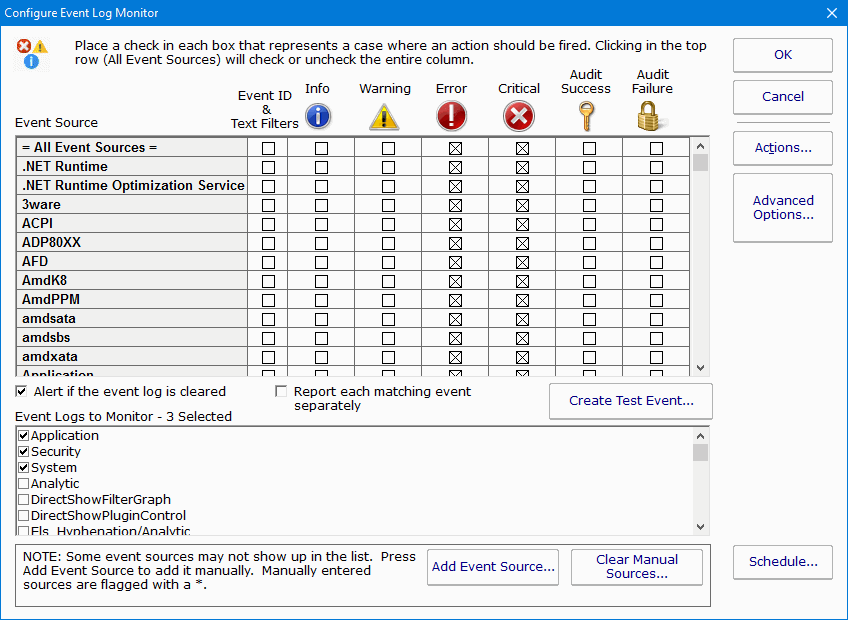
To create a custom monitor, remove any event sources that were checked as the default settings. Scroll through the list and select the applications you are interested in and check the boxes that apply to the types of events you want to monitor.
If you want to monitor all events, simply check the “All Event Sources” boxes at the top of the list. If you want to monitor for a specific ID or event text, just click the Event ID and Text Filters checkbox.
This will open another box. You can monitor “ALL” events or change this to include the specific event IDs or event text you want to monitor. The format for that information will be displayed on the same box at the top.
You can also exclude specific event IDs by adding the IDs or event text to the “Excluded/Ignored Event IDs” line. Once you are done configuring this box, click “OK” to save your changes.
Step 3: Configure the Event Logs you want to monitor.
By default, PA Server Monitor will monitor the Application, Security, and System logs. You can remove any of those you do not want to monitor or add others you want to include. For example, if you are only monitoring an application, then you can go ahead and remove Security and System logs.
Step 4: Configure the Advance Monitor Options.
Click the “Advanced Options” box to open the advanced monitor options box. Make any changes you want here. For instance, if you want to change the Event Monitor name, click the “Details” button and enter the new name for the Event Monitor you are creating. Once you are done making changes, click “OK” to save the changes.
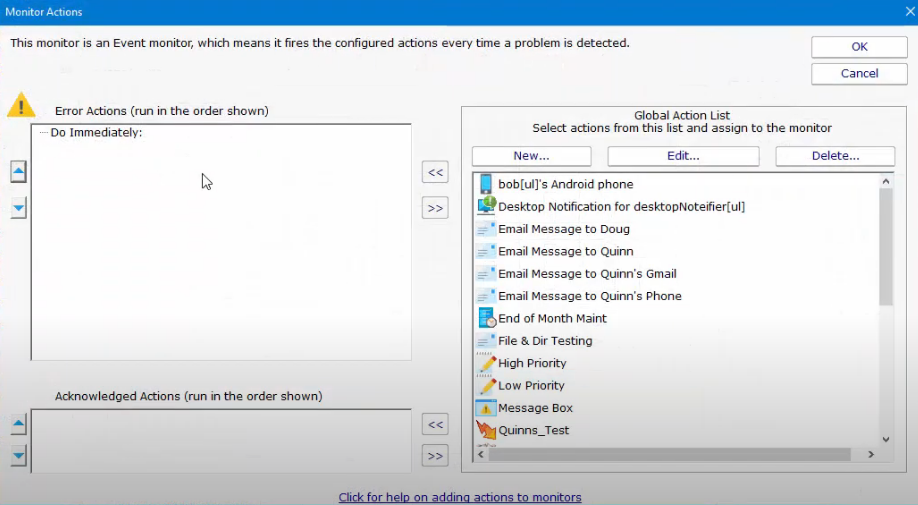
Step 5: Add some actions to the event monitor.
Click the “Actions” button to open a box to add the actions you want. Actions are what you want the monitor to do when “Error Actions” occur—like send an email message to specific people. Make sure to add those same actions to the “Acknowledged Actions” area below. Click “OK” to save your changes.
Step 6: Verify the schedule is configured how you want it.
Click the “Schedule” button to open the schedule settings. The “Schedule” is how often the monitor will run. Chose the settings that you want. Once you are done making changes, click above the box to close and save the changes.
Step 7: Add the monitor to your server.
The last step is to just click “OK” to save all your configuration settings and add the new event monitor to your server.
To create other event log monitors, repeat these steps for each one, as well as for each server you want to monitor.
For further information about PA Server Monitor and our other server monitoring software or to request your FREE, no-obligation, full-access 30-day free trial, please feel free to contact Power Admin at 1-800-401-2339 today!