
By Des Nnochiri
In the first installment of this two-part guide, we considered various ways of improving the performance of Windows 10. To conclude, we’ll be looking at methods for downsizing your Windows 10 installation to promote stability and increase your levels of security and privacy.
Disabling Notifications
The Windows 10 Action Center routinely pushes out notifications concerning software updates, system messages, your email account, social media, and anything else that springs to its mind. If this feels to you like information overload, there are steps you can take to curb this tendency.
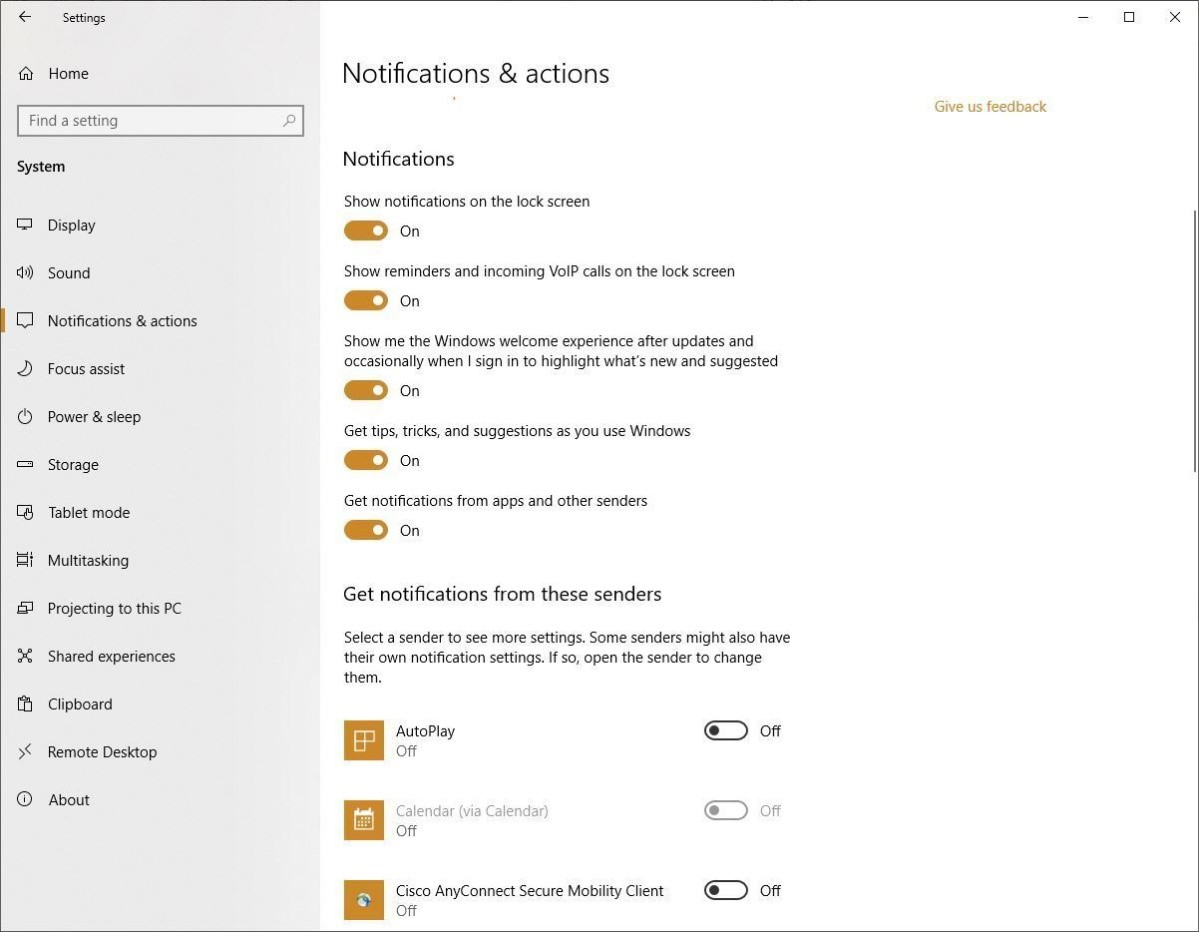
The first step in downsizing your notification load is going to Settings > System > Notifications & actions. There, you’ll discover five types of notifications that you can disable:
1. Notifications appearing on the lock screen.
2. Reminders and incoming VoIP (Voice over Internet Protocol) calls appearing on the lock screen.
3. “Windows welcome experience” tips, which appear after system updates and when you sign in.
4. Tips and tricks appearing as on screen prompts when you use various Windows 10 features.
5. Notifications from apps and other senders.
(Image source: Computerworld )
)
You can disable any or all of these notifications by sliding the button beside them to Off. While the alerts from apps and other senders can become overwhelming, you might wish to keep some of the more essential ones. You can do this by keeping the slider for this item On and going to the “Get notifications from these senders” section underneath. Move this slider to Off for any apps or services you don’t want to get notifications from.
Update Management for Greater Stability
Windows 10 updates have earned themselves a reputation for slowing down, confusing, and quite often crippling their user’s systems. For individuals, this situation can be bad enough. At the corporate level, a flawed and untested update cycle has the potential to bring entire business organizations to a standstill. The situation is made worse because, unlike previous versions of the OS, Windows 10 updates are automatic and compulsory.
Microsoft has recently made moves to allow business subscribers to opt out of certain update cycles, but for the majority of users, the danger of forced updates remains an imminent threat to the security and stability of their systems. However, there are some workarounds you can apply to stop the updating process.
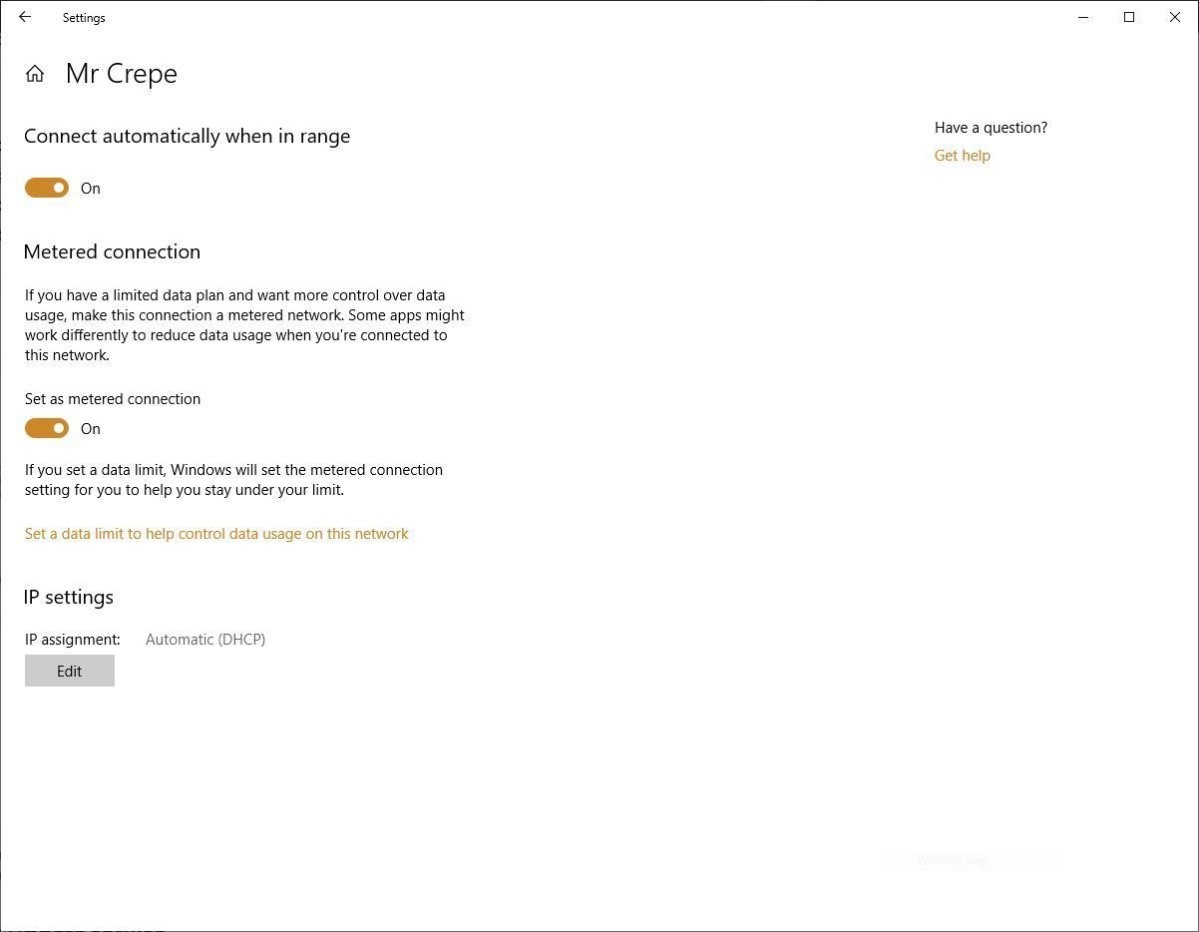
The Windows 10 metered connection feature is enabled by default for cellular data connections but turned off for Wi-Fi and Ethernet. Though intended as a money-saving measure if you happen to pay for bandwidth use over a certain amount, the feature can be used to prevent automatic updates. You’ll first have to enable it for every Ethernet or wireless network that you use.
(Image source: Computerworld)
For Ethernet connections:
1. Go to Settings > Network & Internet > Status.
2. Click on “Change connection properties.”
3. Scroll to the “Metered connection” section on the screen that appears, and move the slider to On.
For Wi-Fi connections:
1. Go to Settings > Network & Internet > Wi-Fi.
2. Click on “Manage known networks.”
3. Select each Wi-Fi network you habitually connect to and click Properties.
4. Scroll to the “Metered connection” section on the screen that appears and move the slider to On.
(Image source: Computerworld)
Though there have been a few exceptions noted, this will prevent Windows 10 from automatically downloading and installing updates via these networks. Important security updates will, however, be allowed to bypass this restriction.
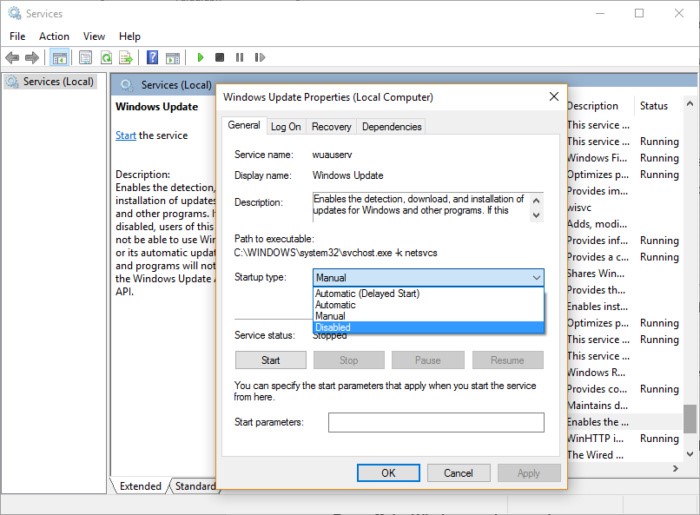
Another method you can use is to turn off the Windows Update service. You can access it by going to Control Panel > System and Security > Administrative Tools. This will send you to a folder in Windows Explorer with a list of administrative tools that includes Services. Double-click on Services, and then:
1. Scroll down to Windows Update on the right side of the screen and double-click it.
2. In the Startup Type box that appears, select Disabled and click OK.
3. Restart your system.
You’ll have now effectively killed off Windows Update service and its ability to download and install updates automatically. An error message will display if you now ask Windows 10 to check for updates. You should re-enable Windows Update occasionally to catch up on any important security patches you might have missed.
These methods will also give you the opportunity to perform due diligence and check the technology press for reports concerning the good or bad qualities of the latest batch of Windows 10 updates.
Downsizing Your System by Killing Cortana
The Windows 10 Anniversary Update released in August 2016 removed the option to easily disable Cortana, Microsoft’s in-built digital assistant. Because of its persistent presence and—some would argue—irresponsible and dangerous sharing of user data, Cortana has raised issues of usability, security, and personal privacy. For post-2016 installations of Windows 10, there is a method for downsizing your digital staff by killing Cortana.
If you’re using any version of the operating system other than the Windows 10 Home edition, you can launch the Group Policy Editor by typing gpedit.msc into the search box. Then go to Computer Configuration > Administrative Templates > Windows Components > Search > Allow Cortana. Set it to “disabled.”
(Image source: Computerworld)
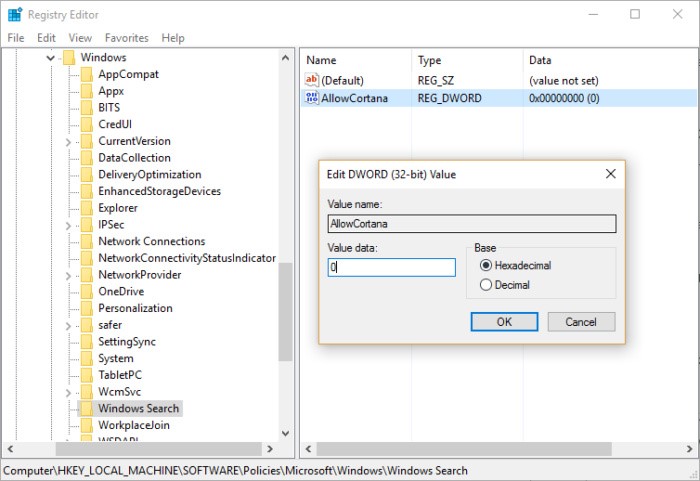
For users of the Windows 10 Home version, disabling Cortana requires editing of the Windows Registry. Proceed with caution and create a System Restore Point first. Then:
1. In the Search box, type “regedit” (without the quotes) to run the Registry Editor.
2. Go to the key HKEY_LOCAL_MACHINE\SOFTWARE\Policies\Microsoft\Windows\Windows Search.
3. If it’s not there, you’ll have to create it. Right-click the Windows folder and select New > Key. Change the default name (such as New Key #1) by typing in Windows Search.
4. Right-click on the Windows Search key and select New > DWORD (32-bit) Value.
5. Name the value (i.e., type in) AllowCortana.
6. Double-click AllowCortana and set its value to 0.
7. Close the Registry Editor.
8. Log out and sign back in, or restart your system to put the changes into effect.
If you ever wish to re-enable Cortana, you’ll need to open the Registry Editor and delete the AllowCortana value or set its value to 1.
With these methods, you’ll be better equipped for managing your Windows 10 updates, downsizing the digital population of your desktop, and increasing your levels of stability, security, and privacy.
In the first installment of this two-part guide, we considered various ways of improving the performance of Windows 10. To conclude, we’ll be looking at methods for downsizing your Windows 10 installation to promote stability and increase your levels of security and privacy.