By Des Nnochiri
Enterprise users of Office 365 often need to configure a multi-function printer to use the platform’s SMTP email capabilities on their network. There are several ways of doing this, each with their own benefits and disadvantages. In this guide we’ll be looking at the steps required in setting up Office 365 network printing and email under various conditions.
The Basics First
As part of an integrated suite of productivity applications, Office 365 does its best to keep things in-house—or more specifically, “in Microsoft”. By default, all Office 365 documents are set to print via OneNote.
Unless you have OneNote installed on your system and/or are content to use this exclusively as your printer option, the first thing you’ll need to do to configure your network printing is to change the default output device .
.
This is a straightforward Windows procedure:
1. From the Start screen, search for “Printers”.
2. Click on “Devices and Printers”.
3. Select the printer you want to set as your default and right-click on it.
4. Choose “Set as default printer”.
The “Drop Down” menu in Office 365 should now display all of your Devices and Printers. You can set a default or choose a particular device for individual printing jobs.
Office 365 Email and Printing Implications
As of September 1, 2018, Office 365 has been slowly rolling out changes to SMTP (Simple Mail Transfer Protocol) client submission, also known as SMTP Authenticated Submission. These changes may affect devices and applications that send emails. They also have implications for the printing of documents from such applications or devices.
Direct Authentication and Client Submission
(Image Source: Microsoft.com)
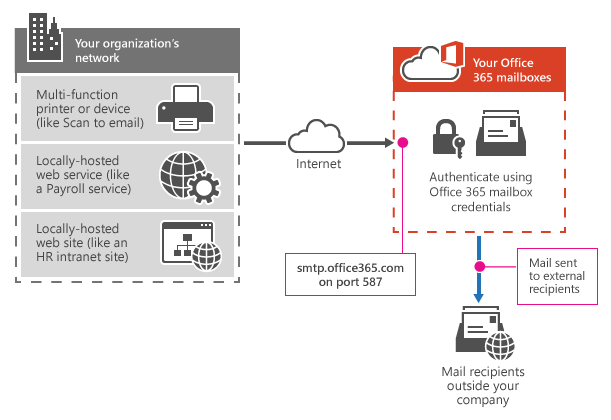
This option requires users to authenticate a device or application directly with an Office 365 mailbox and send mail using SMTP client submission. It’s the best method to use if you wish to send email from a third-party hosted application, service, or device. It is also the preferred option when you want to send email to people inside and outside your organization.
Each device or application must be able to authenticate with Office 365. The email address of the account used to authenticate with Office 365 will be displayed as the sender of messages from the device or application. As long as your scenario meets the requirements for SMTP client submission, the following method will enable you to send email from your device or application:
1. Connect the device or application directly to Office 365 using the SMTP client submission endpoint smtp.office365.com.
2. Set the Server/smart host to smtp.office365.com.
3. Set the Port to Port 587 (the recommended value) or port 25.
4. Set TLS/StartTLS to Enabled.
5. Enter the login credentials of the hosted mailbox being used under Username/email address and password.
Note that you will need to establish which version of TLS (Transport Layer Security) your device supports. Check the device guide or contact the vendor. If your device or application does not support TLS 1.0 or above, you’ll have to use one of the other two options that we shall discuss since SMTP client submission is not supported if your device recommends or defaults to port 465.
If your printer only supports SSL 3.0 and it’s essential to use SMTP client submission, you can set up an alternative but much more complex configuration called Indirect SMTP client submission. This uses a local SMTP relay server to connect to Office 365.
Advantages
• SMTP client submission allows you to send email to people both within and outside your organization.
• Most usage scenarios are catered for, and this is the easiest option to configure.
• Within the organization, this method bypasses most spam checks for email. This can assist in protecting company IP addresses from being blocked by spam lists.
• Email may be transmitted from any location or IP address, including your on-premises network or a third-party cloud hosting service such as Microsoft Azure.
Disadvantages
• You require a licensed Office 365 mailbox in order to send email.
• Devices must be able to use TLS version 1.0 and above.
• Port 587 or port 25 is required and must be unblocked on your network. Some network firewalls or ISPs may block ports, particularly port 25.
• Email may only be sent from one email address unless your device can store login credentials from multiple Office 365 mailboxes.
• Office 365 sets a limit of 30 messages sent per minute and 10,000 recipients per day.
Direct Mail from a Printer or Application
(Image Source: Microsoft.com)
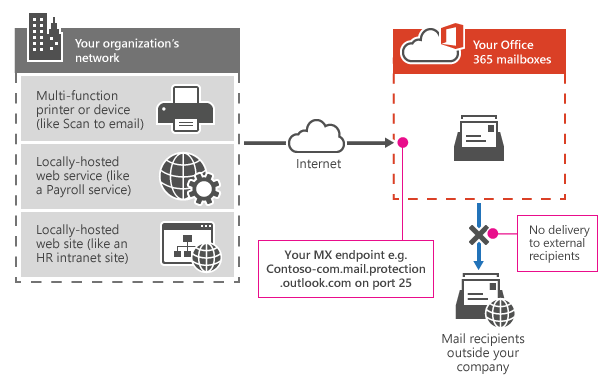
If your device or application doesn’t meet the requirements (e.g., TLS support) for SMTP client submission or if you only need to send messages to recipients within your organization who have Office 365 mailboxes, email may be sent directly from a printer or application on your network. Direct transmission may also be used if you want a device or application to send email from each user’s address but don’t want to configure each user’s mailbox credentials to use SMTP client submission.
The following settings should be entered directly on the device, or inside the application:
1. Your MX endpoint under Server/smart host.
2. Port should be set as Port 25.
3. TLS/StartTLS should be Enabled.
4. Any email address from one of your Office 365 accepted domains should be entered under Email address.
5. Add an SPF record to avoid having messages flagged as spam. From a static IP address, this may be done via the SPF record in your domain registrar’s DNS settings.
Advantages
• Each user in your organization can send email using their own address.
• The method has the security benefit of enabling administrators to avoid having a single mailbox with Send As permissions for all network users.
• Direct send enables you to transmit a high volume of messages, making it the best method for bulk email or newsletters. Office 365 doesn’t allow this under SMTP client submission.
• While direct transmission employs Office 365 to send emails, it does not require a dedicated Office 365 mailbox.
• Devices or applications don’t require a static IP address. Such an address is, however, recommended so that an SPF record can be created for your domain and reduce the risk of it being flagged as spam.
• Direct transmission is not bound by the 30 messages per minute or 10,000 recipients per day limits.
Disadvantages
• Direct transmission cannot be used to deliver email to external recipients, such as users of webmail services like Gmail.
• Messages are subject to anti-spam checks, with the attendant risks. Email transmission may be disrupted if an organization’s IP addresses are blocked by a spam list.
• If your device uses direct transmission to try to relay an email for a recipient who doesn’t have an Office 365 mailbox, the email will be rejected.
• Performance caps are placed on the service by Office 365 throttling policies.
Configure a Connector to Send Mail Via Office 365 SMTP Relay
(Image Source: Microsoft.com)
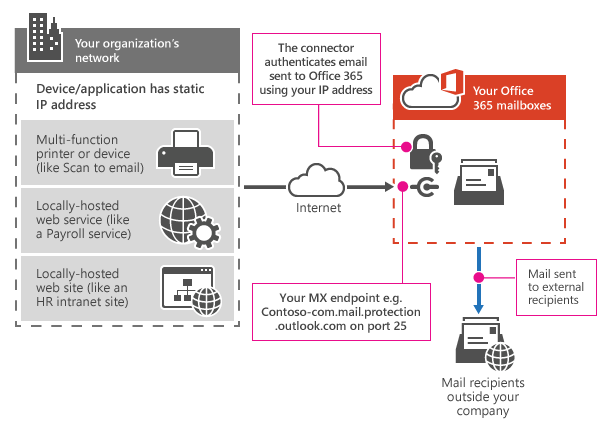
SMTP relay empowers Office 365 to relay emails on your behalf by using your public IP address (or a certificate) to authenticate Office 365. This is the fall-back option when SMTP client submission isn’t compatible with your business needs or device configurations or if email must be sent to external recipients, ruling out direct transmission.
To set up a connector for your Office 365 account:
1. Enter your MX endpoint under Server/smart host.
2. Set the Port as Port 25.
3. TLS/StartTLS should be Enabled.
4. Any email address from one of your Office 365 verified domains may be specified as the Email address.
If Exchange Hybrid has been configured on your network, it’s likely that no additional setup will be required. The same holds true if you already have a connector configured for mail flow from your email server to Office 365.
If neither of these conditions applies, you can set up a mail flow connector as follows:
1. In the From field, specify your organization’s email server.
2. Office 365 should be specified under To.
3. Under Domain restrictions > IP address/range, give your on-premises IP address or the address range that the device or application will use to connect to Office 365.
4. As for direct transmission, it’s recommended that you create an SPF record to avoid having messages flagged as spam.
Advantages
• To send email, SMTP relay does not require the use of a licensed Office 365 mailbox.
• As long as the address uses one of your verified domains, a device or application can send email using any address—including addresses that can’t receive mail or aren’t associated with an actual mailbox.
• Using a connector for authentication, Office 365 can relay messages to your own mailboxes, and to external recipients.
• Under Office 365 SMTP relay, the 30 messages per minute or 10,000 recipients per day limits don’t apply.
Disadvantages
• Unless you need to send email to external recipients, direct transmission is favored over the added complexity of setting up a connector.
• Since most devices or applications are unable to use a certificate for authentication, the device or application server must have a static IP address or address range.
• In order for SMTP relay to proceed, a connector must be set up in Exchange Online.
• Port 25 is required and must not be blocked on your network or by your ISP.
• SMTP relay can’t be used to send email directly to Office 365 from a third-party hosted service, such as Microsoft Azure.
• If your IP addresses are blocked by a spam list, sent mail may be disrupted.
• Office 365 imposes what it calls “reasonable limits” for sending email via SMTP relay.
Depending on your circumstances, any of these three methods will enable you to configure a multi-function printer, applications, or other network devices to use the SMTP email capabilities of Office 365.