By Des Nnochiri
Within a Linux network or development system, launching a limited set of applications or services (often known as microservices) in a self-sustaining container or sandboxed environment is sometimes necessary. A container enables administrators to decouple a specific set of software applications from the operating system and have them run within a clean, minimal, and isolated Linux environment of their own.
All the files required to run a Linux container are sourced from a distinct image, so Linux containers remain portable and consistent as they move from development, through to testing, and ultimately to production. The contents of a container image can be thought of as an isolated installation of a Linux distribution—complete with RPM packages, configuration files, libraries, dependencies, and so on. Maintaining this isolation is a critical part of preserving the integrity of each container.
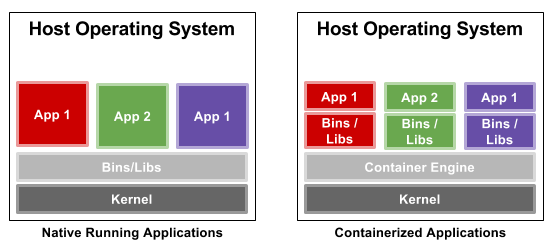
(Image Source: Linux Journal )
)
Ensuring Isolation
Processes running within a properly-configured container are prevented from monitoring or affecting processes running in another. If isolation is properly maintained, then containerized services should also not influence or disturb the host machine.
Control groups, or cgroups, are a Linux kernel feature that controls and limits the resource usage for a process or for groups of processes. The cgroups feature makes use of an initialization system known as systemd, which sets up the user space and manages the isolated processes.
Kernel namespaces allow a variety of identities to be virtualized within the Linux kernel, including process IDs, network names, and user namespaces—which ensure that users and groups enjoying privileges for certain operations inside the container can be denied those rights outside the container.
Laying the Groundwork for Container Creation
Before configuring the Linux environment, you’ll need to verify that the current user has both a uid and gid entry defined in /etc/subuid and /etc/subgid. Writing for Linux Journal, Petros Koutoupis offers the following example (together with the screenshots and other syntax instances quoted in this article):
$ cat /etc/subuid
petros:100000:65536
$ cat /etc/subgid
petros:100000:65536
Configuring the Linux Environment for Containers
if it doesn’t already exist, you’ll need to create the ~/.config/lxc directory, then copy the configuration file /etc/lxc/default.conf to ~/.config/lxc/default.conf. The following:
lxc.id_map = u 0 100000 65536
lxc.id_map = g 0 100000 65536
should be added to the end of the file, which will be of the form:
$ cat ~/.config/lxc/default.conf
lxc.network.type = veth
lxc.network.link = lxcbr0
lxc.network.flags = up
lxc.network.hwaddr = 00:16:3e:xx:xx:xx
lxc.id_map = u 0 100000 65536
lxc.id_map = g 0 100000 65536
Replace the first column of the /etc/lxc/lxc-usernet file with your user name (e.g., petros veth lxcbr0 10). Then either reboot the node or log the user out and then back in.
To verify that the veth networking driver is currently loaded, type the following:
$ lsmod|grep veth
veth 16384 0
If the driver has not been loaded yet, use:
$ sudo modprobe veth
Managing Containers with the LXC Utilities
The Linux Containers project (LXC) provides tools, templates, libraries, and language bindings to improve the user experience when downloading, running, and managing containers. The LXC utilities employ a simple command line, but in order to use them, you need to install them first.
Before the installation on Red Hat Linux or CentOS, you’ll first have to install the EPEL repositories. Distributions like Ubuntu or Debian will complete the LXC installation simply through typing:
$ sudo apt-get install lxc
Downloading a Container
The following command may be used to download a container image named “example-container”:
$ sudo lxc-create -t download -n example-container
The LXC utilities will display three prompts, inviting you to choose the container’s Linux distribution, release, and architecture. For example:
Distribution: ubuntu
Release: xenial
Architecture: amd64
Once you press Enter, the rootfs of the selected container will be downloaded locally and configured.
Starting a Container
To start the container, type:
$ sudo lxc-start -n example-container -d
Using the -d option dæmonizes the container and sets it to run in the background. The foreground option (where you can observer the container’s boot process and be prompted to log in) may be denoted by the -F qualifier.
Troubleshooting Tips
The screenshot below illustrates the kind of syntax you can use to deploy the LXC utilities troubleshooting tools, if any glitches are encountered; for example, if a container fails to initiate properly:
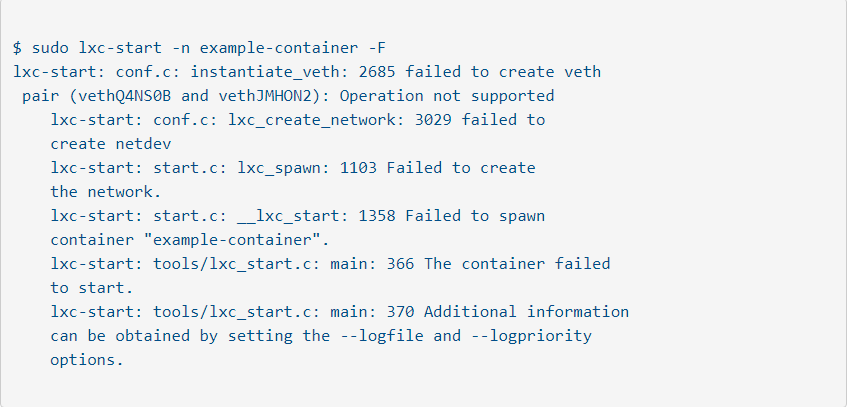
(Image Source: Linux Journal)
There’s a diagnostic facility which allows you to check the current status of a given container:
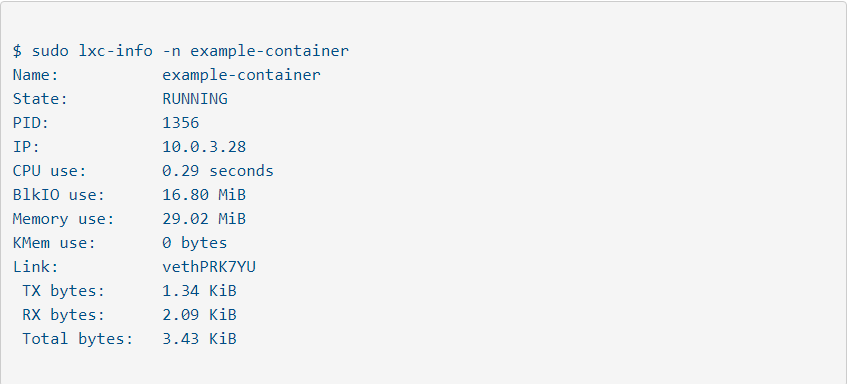
(Image Source: Linux Journal)
You can also do this from the command line by typing the following, which lists all of the installed containers:
$ sudo lxc-ls -f
NAME STATE AUTOSTART GROUPS IPV4 IPV6
example-container RUNNING 0 – 10.0.3.28 –
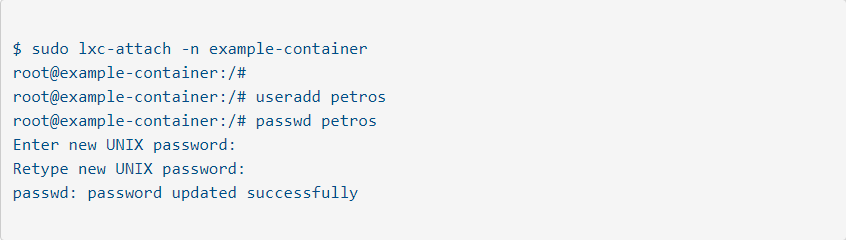
Assigning Access Rights
The password command enables administrators to attach directly to the currently running container, create a list of authorized users, and assign or change their relevant passwords.
(Image Source: Linux Journal)
Oversight for administrators is also available on the host system (rather than from within a container itself), via the following syntax which may be used to observe which LXC processes have been initiated and are running after a container has been launched:
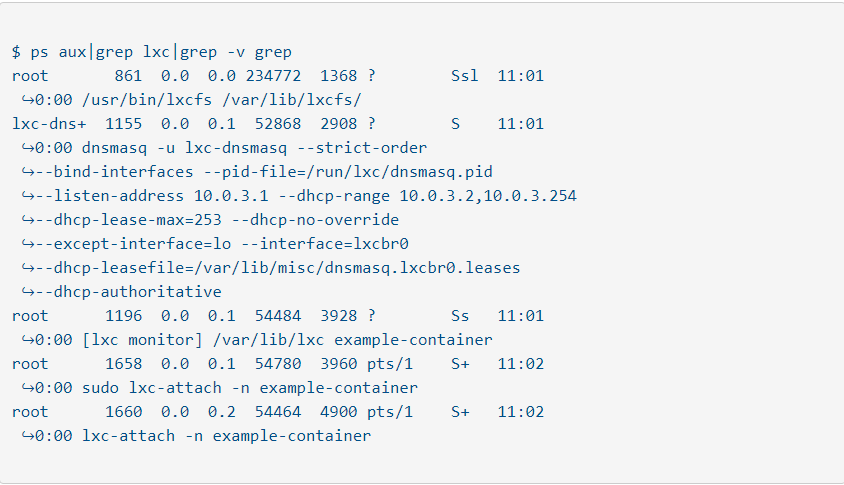
(Image Source: Linux Journal)
Stopping a Container
From the host machine, type:
$ sudo lxc-stop -n example-container
You can then verify the status of the stopped container, using:
$ sudo lxc-ls -f
NAME STATE AUTOSTART GROUPS IPV4 IPV6
example-container STOPPED 0 – – –
$ sudo lxc-info -n example-container
Name: example-container
State: STOPPED
Destroying a Container
Like any virtual environment, a container may be discarded once it has served its purpose. From the host system, type:
$ sudo lxc-destroy -n example-container
(The confirmation dialog will read: Destroyed container example-container)
The following command will verify that the selected container has actually been destroyed:
$ sudo lxc-info -n example-container
(example-container doesn’t exist)
Note that a container has to be stopped before it can be destroyed.
Advanced Configuration Options
The LXC utilities enable an administrator to modify a container’s configuration file (located in /var/lib/lxc), if it’s necessary to configure one or more containers to take on a number of different tasks. This syntax will give access to the relevant configuration file:
$ sudo su
# cd /var/lib/lxc
# ls
example-container
Balancing Privileged and Unprivileged Containers
Unprivileged containers run with a mapping of the container’s root UID to a non-root UID on the host system. This adds a layer of security which makes it harder for an attacker to compromise the container and gain root privileges to the underlying host machine.
Privileged containers don’t provide this level of segregation from the host and can potentially leave a system vulnerable. So it’s a good idea to minimize their use as much as possible.
Choosing Between LXC and Docker
We’ve spoken a lot about the LXC utilities, which are the “native” Linux solution for container management. But a proprietary management system known as Docker also exists, which has been licensed by Apache as an open-source containerization solution for automating the tasks of creating and deploying micro-services inside containers.
Docker uses the kernel cgroup subsystem and takes an image-based approach in treating containers like extremely lightweight and modular virtual machines. Portability and rapid deployment are its main strengths, enhanced by the ability to easily roll back an image layer to its previous version.
However, Docker restricts containers to run as a single process and doesn’t support persistent storage.
Ultimately, the choice of which container management option (or combination of tools) to use will be determined by the operational and administrative demands of your Linux environment.