By Des Nnochiri
While Windows 10 has delivered some performance improvements over its predecessors, there are still areas where the latest version of Microsoft’s operating system (OS) can—and should—do better.
In this first installment of a two-part guide, we’ll be offering some tips and tweaks aimed at boosting the performance of your Windows 10 installation.
Speeding Up the Windows 10 Boot Process
Start-up time is one notable area where Windows 10 lags behind previous versions of the OS. There are two options for speeding up your boot process.
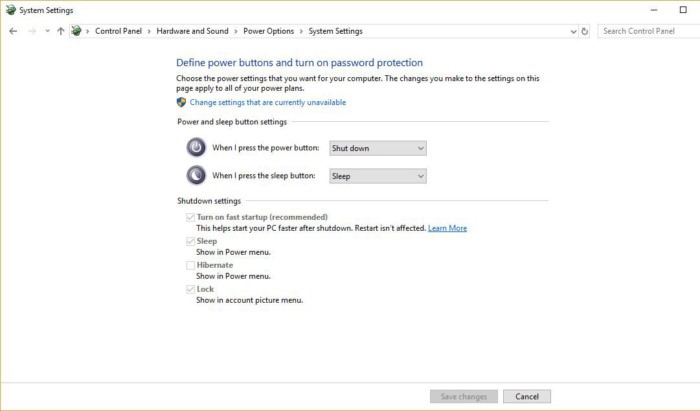
In the first method, you can enable Fast Startup, a Windows 10 feature which combines a normal shutdown with the Windows hibernate function. This will force the system to write to disk storage all the information it needs to recreate your current session, when you next power on the machine. When you shut down your PC, Fast Startup closes your running applications, logs off all users, then loads the Windows kernel and drivers to a hibernation file on your hard disk.
At the next startup, Windows 10 will reference this data from a single file, rather than loading each device driver from a separate location on your hard drive. This significantly reduces your starting up time.
(Image source: Computerworld )
)
To access the Fast Startup feature and enable it if it isn’t already running:
1. Right-click the Start button and select Power Options from the menu that appears.
2. Select “Additional power settings.”
3. Click the option to “Choose what the Power buttons do.”
4. If “Turn on fast startup (recommended)” has a check mark next to it on the “Shutdown settings” section of the screen, the feature is already enabled, and you have nothing further to do.
5. If the Fast Startup option isn’t already selected, click on “Change Settings that are currently unavailable.”
6. Put a check in the box next to “Turn on fast startup (recommended)”, and click on “Save changes.”
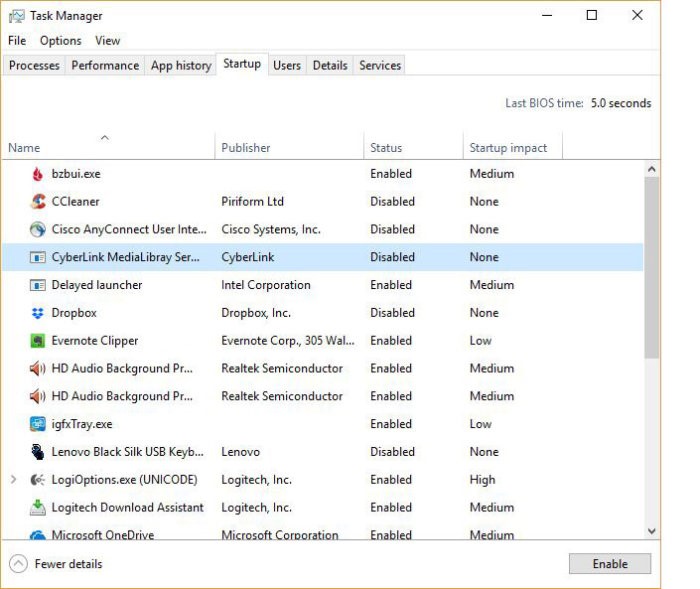
The second method for accelerating the boot process employs the Windows 10 Task Manager, which also includes options for disabling applications that run on startup.
(Image source: Computerworld)
1. Right-click the taskbar and select Task Manager.
2. If Task Manager isn’t already running in a maximized window, click the “More details” link at the bottom of the screen. This opens up an expanded view with multiple tabs.
3. Click the Startup tab, which lists all the applications that run at boot time.
4. For each application that you don’t want to run on startup, right-click and select Disable. If you like to have any of these programs running during your sessions, you can start them individually once the boot process completes.
The Windows 10 Task Manager also includes a “Startup impact” column, which shows the degree of influence (low, medium, or high) that each program has on your startup time. You can use this to prioritize which applications to disable or allow.
For programs on the list that you don’t recognize, right-clicking on the name and selecting “Search online” will pull up relevant information on that application from the internet to help you decide. Alternatively, if you right-click on the program name and choose “Open file location,” Windows Explorer will take you to its application folder, where you’ll be able to see the executable file and its associated libraries.
Optimizing the Start Menu
Users of Windows 8 and 8.1 (Remember that one? Neither does anyone else…) bemoaned the lack of a Windows 7 style Start Menu, so Microsoft reinstated that tool for Windows 10. Unfortunately, its performance in execution can be patchy at best. Many users complain that it freezes, doesn’t open when they click the Start button, or displays and hides random entries.
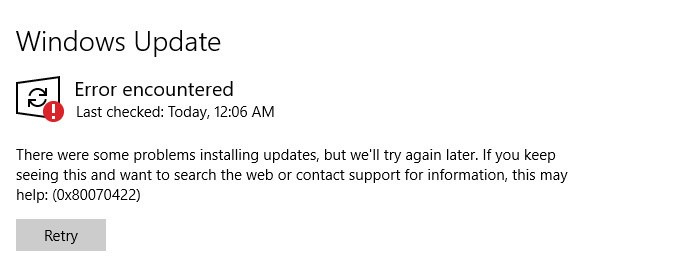
If rebooting your machine doesn’t fix your Start Menu, there are a number of alternatives you can try. Though they can be the source of a whole set of other issues, Windows 10 updates may deliver a solution. If you’re willing to take the risk, go to Settings, Updates & Security, Windows Update, and select “Check for updates.” Install the latest one, reboot your system, and hope for the best.
The command-line tool known as PowerShell is a Windows 10 feature with the ability to repair corrupted files, which may be the cause of Start Menu glitches. In the Windows search box, type “powershell” (without the quotes), right-click Windows PowerShell in the search results, then select “Run as administrator.” If you then type “sfc /scannow” and press Enter, PowerShell will scan your system for corrupt files. If PowerShell found corrupt files but couldn’t fix them, type the command “dism /online /cleanup-image /restorehealth” and press Enter.
Should your Start Menu continue to misbehave despite all of the above, you can create a new local administrator account. If the Start menu functions in that one, move all of your files and settings over to it. As a last resort, try resetting your PC with Windows 10 recovery options.
Recovering Lost Storage for Better Performance
Each time you upgrade your system or install a major update, Windows 10 retains the earlier version of your operating system, just in case you want to switch back to it. This can result in the redundant storage of several gigabytes worth of files and applications on your hard drive.
(Image source: Computerworld)
At one level, having this data present can prevent future versions of Windows from even installing, due to a lack of available disk space. At another level, processes or programs that rely on swap files may be starved due to a shortage of resources for creating virtual memory or storage.
You can use the Disk Cleanup tool to delete old Windows installations (stored in a folder called Windows.old, in the /Windows folder) and to recover otherwise “lost” storage space that may be hampering your system performance.
In the search bar, type “Disk Cleanup” and click the Disk Cleanup search result to initiate a file scan. When the program displays the results, scroll down the file list and check the box beside “Previous Windows installation(s).” The list may also include other files that you wish to clean up. Click OK to delete the files you choose.
With these optimizing tips, you should now be in a position to squeeze some better performance out of your Windows 10 installation.