
 Chances are, if you work with enough computers and workstations, sooner or later you are going to find a need to partition a disk drive. In this article we will discuss the elements to consider when partitioning your Windows OS (Operating System). We will talk about different partitioning technologies, tools used to interact with your hard drive and also the most important aspects that are involved in this mechanism. Some of these features you have probably worked with at some point, but others may not be that familiar. Therefore, we recommend you read the entire article.
About the Hard Disk You Need to Partition
Before considering the software aspects such as disk partitioning style or size, you will have to buy and install the storage device. As a home user you are probably not working with complex storage devices such as NAS or SAN. The most common type of storage device is the mechanical hard disk. These are called mechanical because these devices have rotating magnetic discs in which data is stored (as opposed to SSD or solid state drives.) Hard disks can come in different physical sizes, of which the most common are the 2.5” and 3.5”.
All computer cases have special racks for installing hard drives. The hard-disk capacity may vary from several GB to dozens of TB. Another important aspect to consider is the rpm (rotations per minute) value. Most computer hard drives rotate at 5400 or 7200 rpm. You’ve guessed it, the higher the number of rpm, the better.
Types of Disk Drives
There are two main bus technologies used in today’s hard disks, ATA and SATA. I will not talk about them right now (probably in a future article we will discuss about these two technologies.) A newer hard disk technology was developed and became very popular, SSD or Solid-State Drives. These are electronic disks that are somehow similar to a computer’s memory. These devices use no mechanical components, their speed is much higher than traditional hard-disks and they are less susceptible to failures.
I don’t know the exact technology behind these SSD drives, which could be a good topic for a future article. What I do know is that these devices use NAND flash memory. SSD drives are more expensive, but I tell you folks, they are worth the extra money because the speed is increased considerably. You can opt for a small sized SSD drive in which your OS will be stored and another traditional hard-disk for data storage.
Partitioning Technology
After choosing the right hardware, it’s time to consider the partitioning technology, the number of partitions, and the File System technology used. I would recommend reserving plenty of GB for the OS partition. By adding different partitions, you increase the data protection in case of OS failure. The two most common file systems used today are NTFS and FAT32. NTFS is a newer version than FAT meaning that it has some technical improvements and you should always use it if your computer’s configuration allows such a file system.
OS Partitioning Considerations
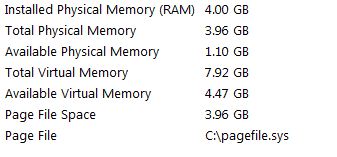
The OS partition is created the first time you install Windows. Consider the general usage of the OS partition. Besides the Windows components, are you going to install additional software? Are you going to store your user’s profile in the C partition? Another element that you should consider is the size and location of the page file. The normal location of the page file is C:\pagefile.sys. After installing the OS, check out the size and location of the page file by running the command msinfo32 (system information) tool from the run prompt. Here is the output of this command:
Changing Page File Size and Location
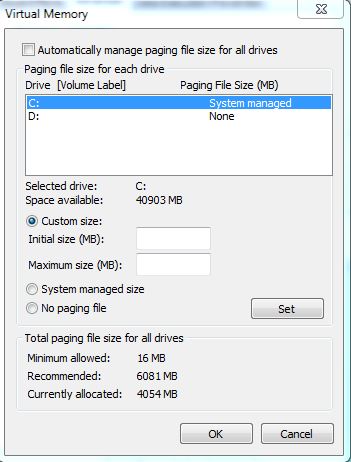
To change the location and the size of the page file navigate to Control Panel\System and Security\System, press Advanced system settings, click Settings under Performance tab, press advanced and then click again on the Change button. Deselect “Automatically manage paging file size for all drives” and enter the desired values:
Third Party Partitioning Tools
There are many third party tools that can be used to partition your OS. I’ve worked with Acronis Disk Director, PartitionMagic and O&O PartitionManager Pro. I’ve created, deleted, and resized partitions with these tools and I would recommend them to anyone, especially Acronis Disk Director which can be found in the Hiren’s Boot CD.
When first installing your OS on a brand new hard drive, Windows will prompt for creating partitions. At minimum, the OS partition must be created. You can change your configuration later using the Windows partitioning tools. The OS provides its users with two powerful partitioning tool utilities:
Partitioning a Drive with DISKPART Utility
DISKPART utility – this is a powerful command line utility with which you can interact with your hard drive. Everything from creating and deleting to converting partitions can be made with this tool. Remember, unlike Disk Management, this tool will let you delete or interact with critical partitions (OS) and you will not be able to create partitions on removable devices such as pen drives.
You can also change a partition from MBR or GPT and vice versa. With DISKPART you’ll have to enter a partition letter manually, so be careful when performing a partition creation or drive assignment operation. Another cool feature of this tool is that it does support scripting by using the diskpart /s script.txt command. I will briefly cover how to interact with this tool. For more information check out the following link from Microsoft’s website: http://support.microsoft.com/kb/300415
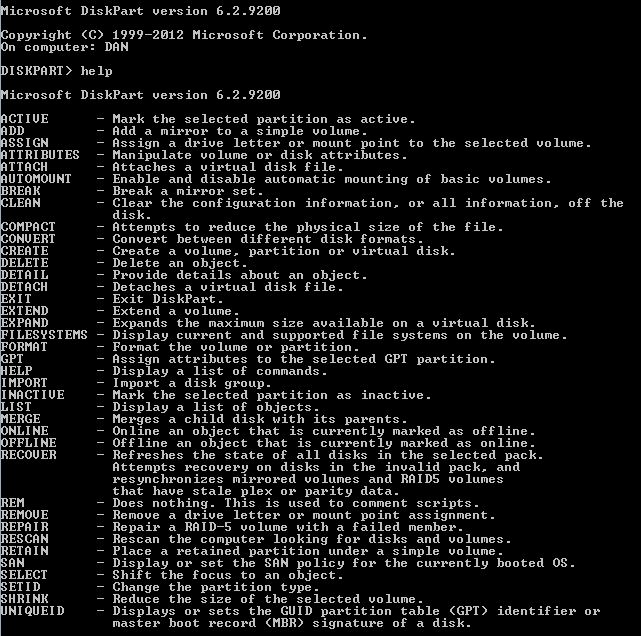
Open a command prompt and type DISKPART and the press enter. Now, type help to view the available commands.
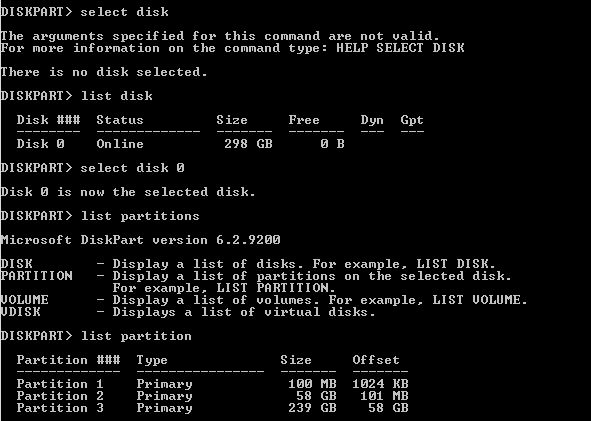
Now let’s see the hard-disks installed on this computer by typing the list disk command:

As you can see, I currently have installed a 300 GB hard disk. OK folks, now let’s view the partitions currently created on this drive. First, we’ll have to select the desired hard disk by typing in the select disk [number] command (in this case select disk 0). I will now type the list partitions command to display the partitions that were created on this hard disk:
You can experiment with all the available commands in this tool. Use the active command to inform your machine of a valid OS partition. Also try to create volume simple/stripe/raid, delete volume or assign letter= [letter]. I recommend that you practice with this tool in a testing environment because a bad configuration can result in a system crash. In the end, type exit to close this tool.
Partition Windows Drives with Disk Management
Disk Management – you may have already interacted with this GUI tool. Open this utility from the Administrative tools or type diskmgmt.msc from the run prompt: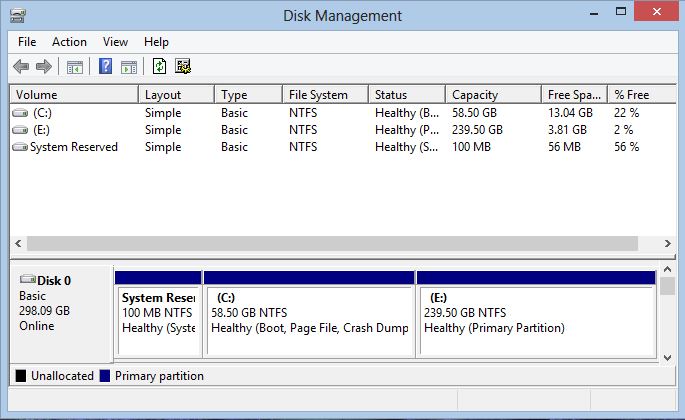
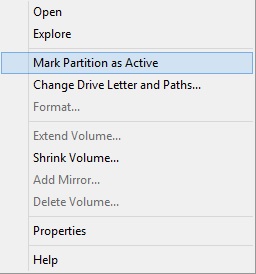
All commands available in the DISKPART tool can be used with Disk Management. Right click a partition to view the commands:
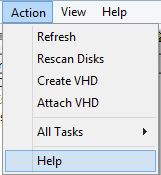
Also you can check out the Actions menu too see other available commands:
Disk management is a more user friendly tool (so intuitive), which is why I recommend any user to try it instead of the DISKPART utility.
I hope we have covered all the steps needed to interact with your hard disk. Please leave your suggestions, or post any questions that you have. Enjoy your day and stay tuned for the following articles from PowerAdmin!
Author: Popescu Dan-Alexandru
Email: dancb10@gmail.com
Website: www.ittrainingday.com