

IP address management (IPAM) is a new feature introduced in Windows Server 2012 that allows you to configure, manage and have a general overview of the network’s IP addresses and ranges. With IPAM, you can search for desired IP addresses and ranges, manage and configure DHCP scopes and DNS entries, view the status of your IP addresses blocks and search for free IP addresses. Large enterprises usually deploy one or multiple IPAM servers because, as the network evolves, the complexity of its IPs and subnets increases significantly.
An IPAM server allows you to track all IP address changes that occur within the network. I’ve previously used IPAM software from other vendors, but never from Microsoft. With the release of Windows Server 2012, System Administrators were able to track and manage all network devices from an Active Directory domain. Note that this is a requirement of IPAM, you cannot manage any servers that do not belong from the same Active Directory forest. Because this is a Microsoft technology, you cannot use this feature with non-Windows Operating Systems or network devices. IPAM allows you to manage both DNS and DHCP servers and you can now easily change DHCP options from one or multiple scopes using the centralized IPAM console. You can also track dynamically assigned addresses but also static ones. Both public and private IP addresses can be tracked with IPAM.
In this article I will show you how to install and configure IPAM and we’ll also cover some of its basic features. Note that I will be using a Virtual Machine hosted in my VMware testing environment running Windows Server 2012. My VM is also a member of an Active Directory forest so make sure to cover this aspect as well.
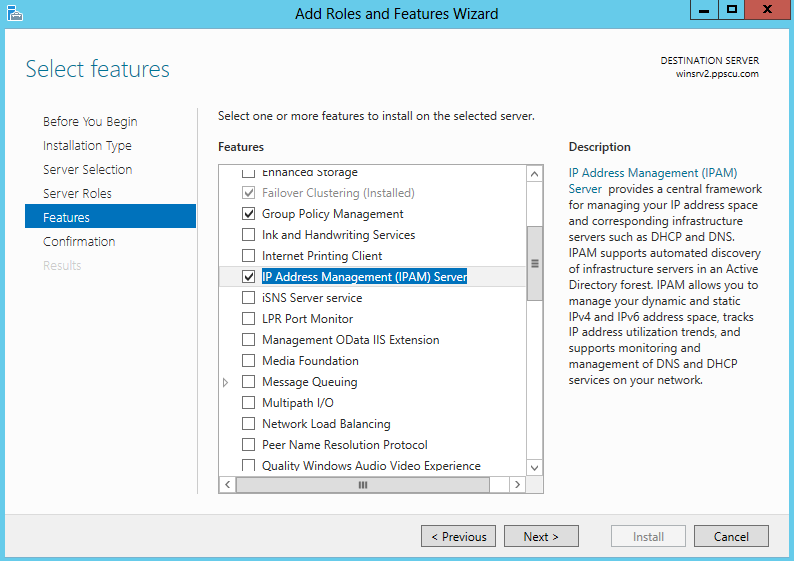
Step 1 – Installation
IPAM can be installed in two ways: using Windows Powershell or by accessing the Roles and Features section from Server Manager Console:
With Windows PowerShell this operation can be performed much faster by executing the following command:
Install-WindowsFeature IPAM –IncludeManagementTools
Step 2 – Provisioning
Once the installation has been successfully completed, open the Server Manger Console and navigate to the IPAM section. Here you will discover all available IPAM server tasks:
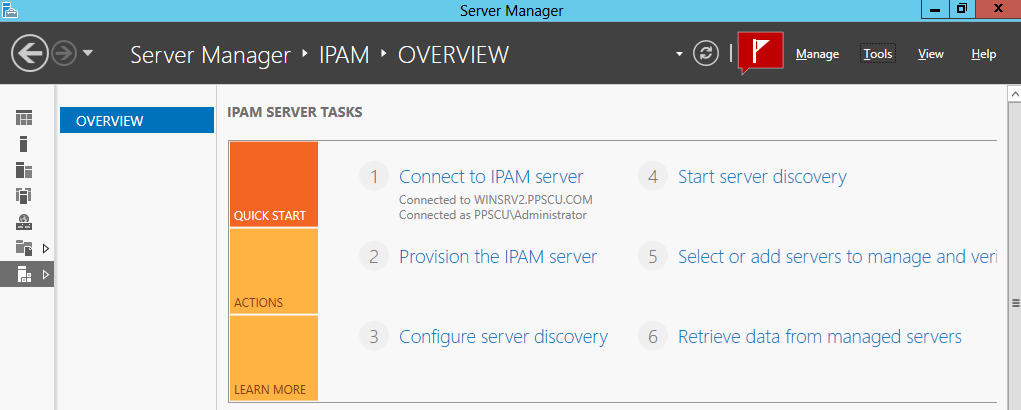
Select the second option, Provision the IPAM, to start the IPAM configuration wizard. In this section is where the IPAM database, security groups, tasks and folders are created.
Step 3 – Provisioning Method
You must configure how the IPAM server interacts with network servers, there are two options available: manually or by using GPOs. Simply put, by selecting the first option, an administrator would have to configure security groups, firewall rules and network shares manually on each machine. This method is really not recommend since it adds a lot of extra configurations and increases the overall complexity of the IPAM deployment.
The second option is much easier to implement since it uses Group Policy Objects to configure all IPAM managed servers. Unless you simply cannot you use the second option, you should always use GPOs to configure servers managed by IPAM. Note that you have to specify a prefix that will be set to the IPAM GPOs:

Once the wizard has been successfully completed, three Group Policy Objects will be created: one for DNS servers, one for DHCP servers and one for Domain Controllers.
Step 4 – Configure Server Discovery
Select the third task from the IPAM console to configure server discovery. This is where we specify what servers should be discovered by our IPAM machine. You will need to select and add domains to discover. By default, all three types of servers are selected: DNS, DHCP and Domain Controllers. You can change the discovery options by selecting only desired types of servers:

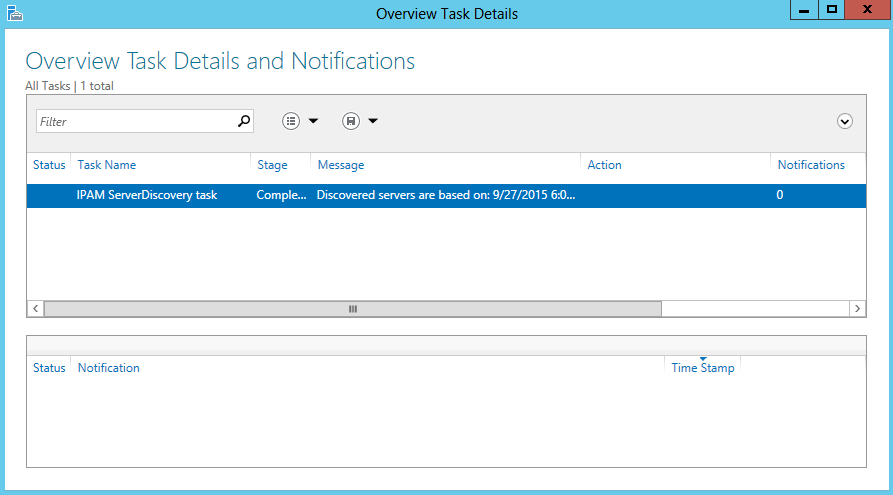
Step 5 – Start Discovery
Once this section has been covered, select the 4th task to start the server discovery procedure:
If you receive an error stating that discovered machines were blocked, you need to execute the following Powershell command to create the GPOs that later will be assigned to your machines:
Invoke-IpamGpoProvisioning -Domain ppscu.com -GpoPrefixName IPAMPPSCU

Step 6 – Verify GPOs
You can now verify the GPOs in the Group Policy Management Console. Connect to the blocked machine and execute gpupdate /force to propagate the newly created GPOs.
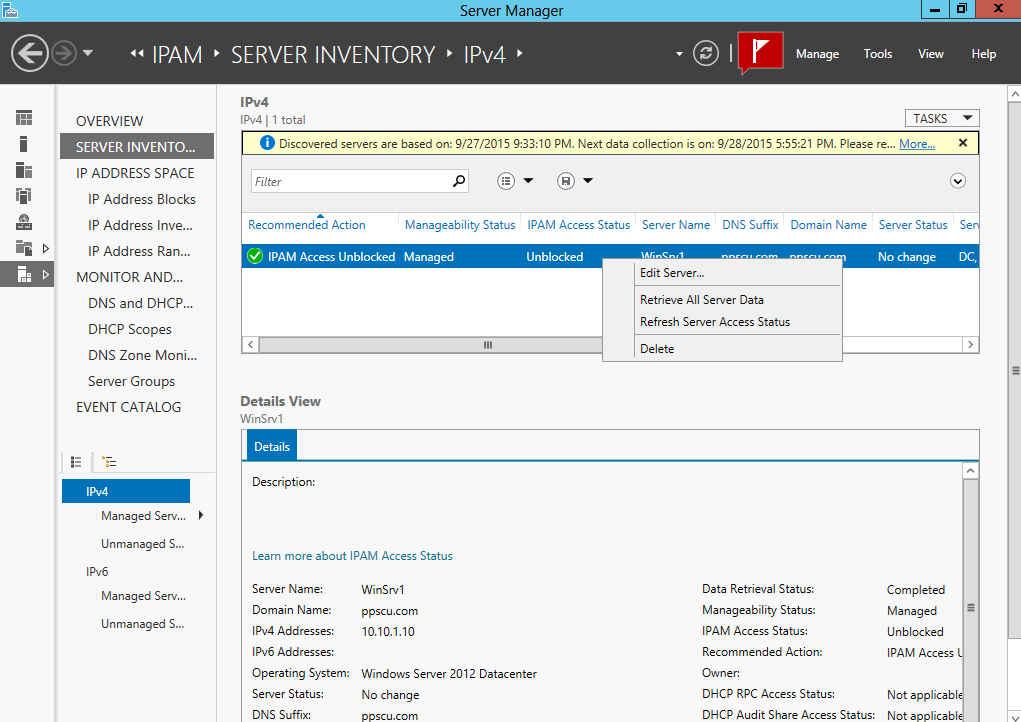
For each machine you will have to change its manageability status to managed, you can do so if you right click on the blocked machine and select edit server:
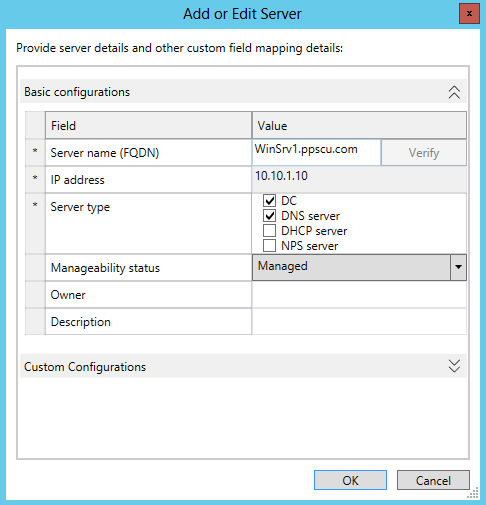
The machine should change its IPAM Access status to Unblocked.
Step 7 – Import Data
Now that the server has been added to IPAM, you can retrieve and import its data to the IPAM server if you right click on the machine and select Retrieve All Server Data. You can also execute the 6th available task from the IPAM console to retrieve data from managed servers:
That’s about it for the configuration part of an IPAM server. We’ve covered the most important steps that you need to take in order to successfully deploy IPAM within your enterprise. If you have followed these steps precisely, you should have installed and configured an IPAM machine with at least one discovered host. Note that same principles are applied when used in a large organization with multiple hosts. I want to further discuss about other aspects of this technology so stay tuned for the following article in which we’ll mostly talk about IPAM IP address spaces. Wish you all the best!