
 In the last article we’ve scratched the surface of the remote access technology available with Windows Server 2012, named DirectAccess. I’ve tried to cover the most important aspects of DirectAccess so we can go further and discover the practical usage of this feature. The method of installing and configuring DirectAccess has been simplified with the release of Windows Server 2012. You can install DirectAccess using either the graphical interface or Windows Powershell.
To install DirectAccess open up Server manager console and click on Add Roles and Features link and navigate to the Roles section. Select the Remote Access role and proceed to the next section.
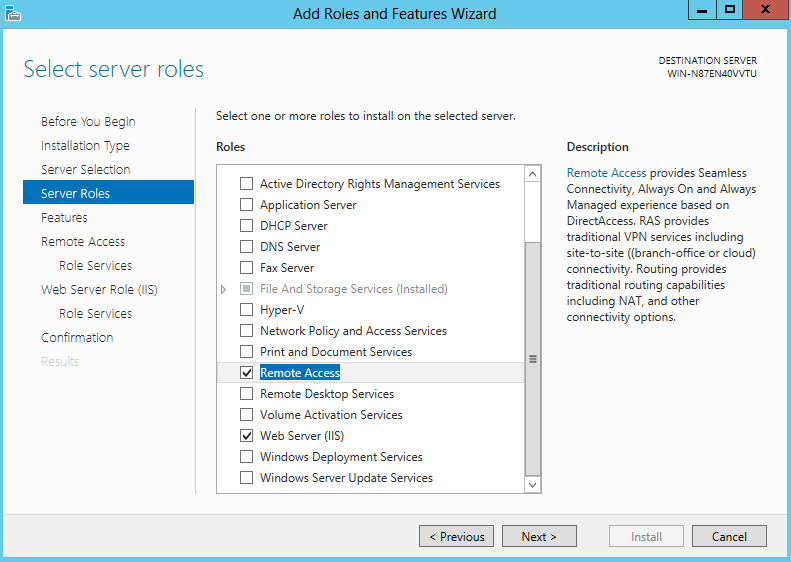
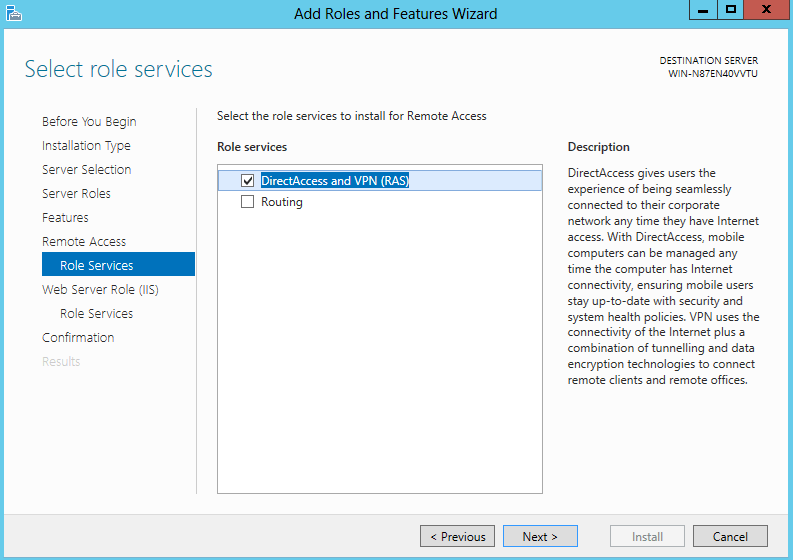
In Windows Server 2012 you can configure the server to host both VPN and DirectAccess services simultaneously. Additionally, you can install the Routing service on the same machine:
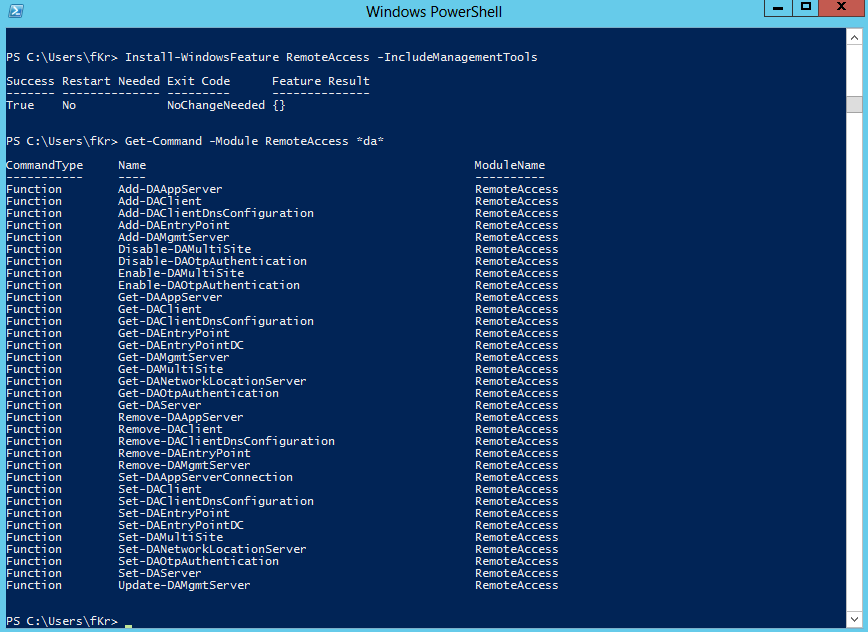
To install DirectAccess using Powershell, use Get-WindowsFeature to list available roles and then execute Install-WindowsFeature RemoteAccess –IncludeManagementTools. Once the installation is completed successfully, use the Get-Command -Module RemoteAccess *da* cmdlet to view available configuration commands for DirectAccess:
Open the Remote Access Management Console and click on Run the Remote Access Setup Wizard. Once the wizard has started, click on Deploy DirectAccess only:
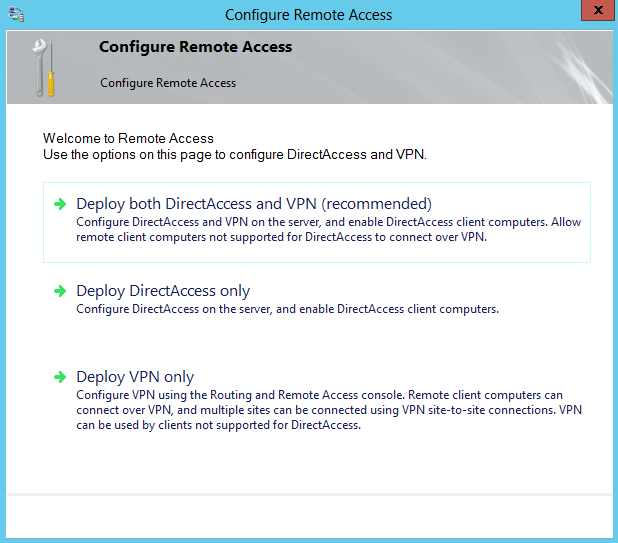
Note that DirectAccess can only be installed on a server that is part of an Active Directory domain. The wizard will conduct a prerequisite check to verify if all requirements are met to configure DirectAccess. If your server is not part of an AD domain, the wizard will throw the following error:

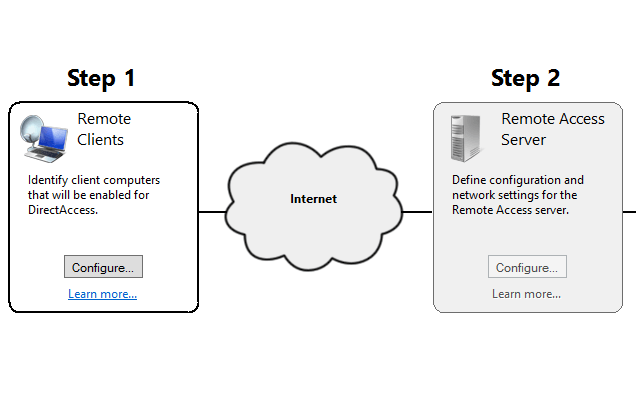
Once the prerequisite check is completed, the map with the whole DirectAccess infrastructure is presented. This map is composed of four configurable sections, to successfully deploy DirectAccess within your company, you will have to configure each of the following components:
Step1: Remote Clients
Step2: Remote Access Server
Step3: Infrastructure Servers
Step4: Application Servers
In this article we will focus on the first item of the DirectAccess infrastructure and we’ll continue with the rest in a future article. The Remote Clients configuration section is displayed in the DirectAccess map as follows:
To start the Remote Clients configuration wizard, click on the Configure button. Windows Server 2012 offers two possible configuration options:
· Deploy full DirectAccess for client access and remote management – offers bidirectional communication between remote clients and the enterprise network. Clients will be accessible from within the network for remote management, but they will also be able to access network resources using the Remote Access Server.
· Deploy DirectAccess for remote management only – clients are accessible from within the network, but they are not able to access network resources from the Internet. This option is new to Windows Server 2012 and is mostly used when remote clients are managed via tools such as SCCM.

For now we’ll configure the default option to deploy full DirectAccess installation. In the next section is where we configure the security groups that will be allowed to establish connections with the Remote Access Server. I’ve created an AD security group named “DirectAccess Clients” and I’ve added it to the allowed DirectAccess groups:
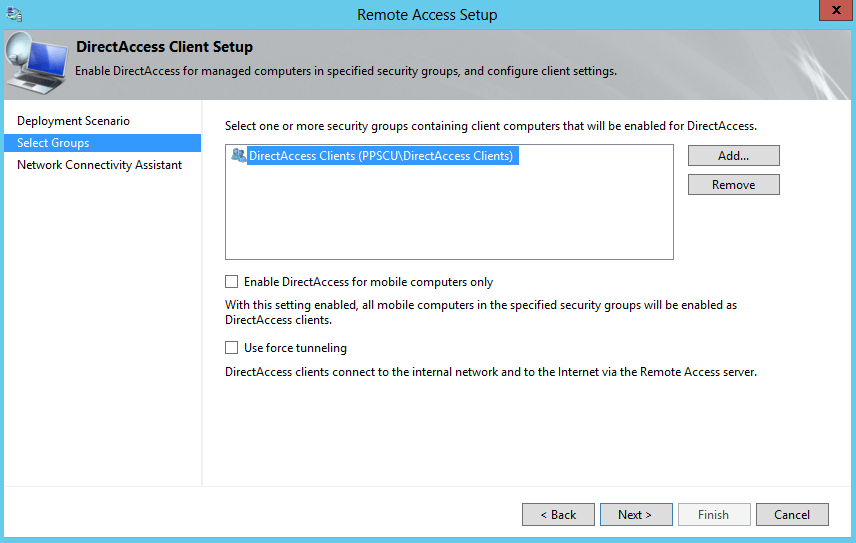
Note that you can enable DirectAccess for mobile computers only to ensure that no Desktop computers will be able to connect to your Remote Access Server. The second option, Use force tunneling, will redirect all traffic to your Remote Access server thus ensuring that traffic is passed to-and-from your DirectAccess machine. Leave these two options unchecked for now.
Within the final step of this wizard you will have to enter the HelpDesk email address, allow local name resolution for DirectAccess clients and set a network connectivity assistant if desired (this setting allows DirectAccess clients to determine if they are located within the enterprise network or they are located in a public network):

The Remote Clients configuration section can be easily made using Windows Powershell with the following cmdlets:
Set-DAServer -DAInstallType ManageOut or Set-DAServer -DAInstallType FullInstall
Add-DAClient –SecurityGroupNameList “ppscu.com\DirectAccess Clients”
Set-DAClient -ForceTunnel “Enabled” -OnlyRemoteComputers “Enabled”
Once the Remote Clients have been configured, we’ll need to proceed to the Remote Access Server configuration page. I don’t want to make this article too long so we’ll continue with the next configuration steps in the next one. You can also experiment with the Powershell installation if you are interested in automatization. Since this configuration is mostly done once, I prefer using the interface. Hope you’ve managed to complete this first step of the DirectAccess configuration and if not, don’t hesitate to post a comment in our dedicated section. Stay tuned for the following article.