This help page is for version 4.1. The latest available help is for version 9.4.
Adding Computers
There are two ways to add computers/devices to the system to be monitored: individually and many at once. Both options are described below.
Many at Once
The easiest way to add many computers/devices to the system at once is to use the Smart Config process. This will let you paste in a list of server names, device names or IP addresses that you want to monitor. You can also press the Discover button to help get that list. You'll also be able to choose a list of monitors to auto-configure for the new entities.
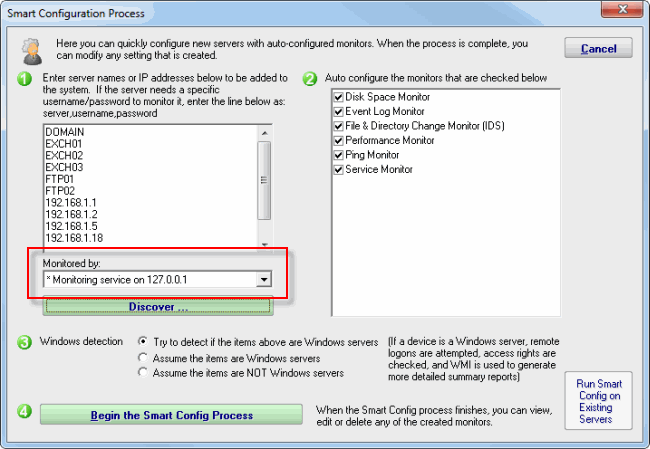
If you are using Satellites it's very important to make sure that the Satellite you want to monitor the new servers is selected in the "Monitored by". If not using Satellites, this box will select the Central Monitoring Service.
The Smart Config process will add the new computers to the top Servers/Devices group. You can use Bulk Config to easily move many servers at once to different groups.
See Smart Config for more detailed information.
Adding Individual Computers
You can manually add a single computer to be monitored by right-clicking on any group in the left navigation pane in the Console. Doing so will first show the dialog below to collect the server name.
The "This is a Windows computer" gives the system hints about how it might need to authenticate with the remote computer. "Use WMI..." tells the system whether to attempt to query the new computer with WMI (Windows Management Instrumentation) in order to create a more detailed status report. Unchecking this value, even for a Windows server, will have no other effect other than a slightly less detailed status report. You can change these two settings later by right clicking on the computer and selecting Type & Credentials -> Set Server Type.

"The computer/device will be monitored from" lets you specify whether the Central Monitoring System or a remote Satellite will be monitoring the device. Naturally the monitoring system that has access to the device should be chosen.
Set Server Type
The next step is to tell PA Server Monitor what type of server/device is being added. This helps the product know which protocols to use when communicating with the server/device. The dialog below is how you indicate this. The buttons on the right let you give device-type credentials (ie Windows username/password, SNMP community string, etc). The button also indicates the credentials currently being used.

Windows Credentials
If setting credentials for a Windows server, the dialog below will be shown. You can enter credentials, or just monitor the server using the login that the monitoring service is already using. The middle radio button is a convenience feature -- it lets the system try already-entered passwords to find one that works.

You can change these credentials later by right clicking the computer in the navigation pane and selecting the Type & Credentials -> Set Login Credentials menu item. The help page Remote Monitoring Hints has some advice and information about user accounts when monitoring Windows servers.