This help page is for version 4.0. The latest available help is for version 9.4.
Smart Config
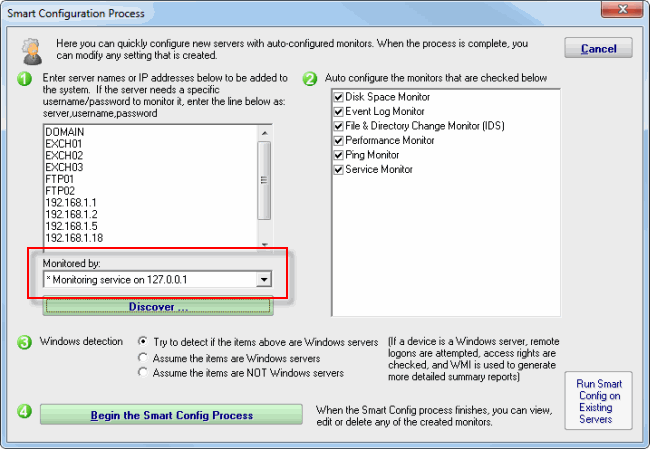
The Smart Config feature is a very useful tool for quickly adding servers or devices to be monitored. You specify one or more servers, and the monitors inspect the servers/devices and create appropriate monitors for each one based on default settings.
You can access the feature by clicking the Smart Config button at the top of the Console.
You can paste a list of server names or IP addresses into an edit box. You can also press the Discover button to find a list of servers for you (more on that below).
You can optionally specify
a username and password to use when accessing the server by entering any line
in the form:
server_name,username,password
(for another example, open the
dialog below in the Console, and let your mouse hover over the server list
window for a helpful hint).
If no username/password is given, the configuration procedure will try already entered credentials to see if they will work. Otherwise the service's Login As user will be used.
Monitored By
At the bottom of the server list is a list of monitoring installations. By default the Central Monitoring Service is chosen. If you have
remote Satellite monitoring sites, you can indicate that the remote Satellite should monitor the list of servers. That means newly created servers/devices
in the system will be assigned to the monitoring system chosen.

The next step is to select which monitor modules should inspect the server(s)/device(s) and press "Begin the Smart Config Process". In a few moments you'll have monitors automatically configured for your specific environment. Naturally the auto-created monitors can be changed or deleted just like any other monitor in the system.
A subtle button at the bottom right lets you run Smart Config on existing servers/devices. This will open up the Bulk Config feature and guide you through the rest of the process.
Existing monitors and actions are not modified -- new monitors and new actions are created while leaving the existing monitors and actions alone. If an existing monitor of a particular type already exists, Smart Config will not add a duplicate.
Server Discovery
Pressing the green button labeled "Discover" allows PA Server Monitor to scan the network for servers and devices without having to manually gather this information. The following dialog will appear on top of the Smart Configuration dialog.
If you selected a Satellite service in the "Monitored by" box mentioned above, the discovery scan will be sent to the remote Satellite to be performed. That means you can discover servers/devices at remote sites to be monitored even if you are not on the remote network.

The following options are available for Server Discovery:
- Query Windows for servers it knows about: Windows has its own network discovery process that PA Server Monitor will query to find servers that Windows knows about.
- Ping the following IP Address range: A Ping message will be sent to each address that exist in the range of IP addresses given.
- Send ping to .0 and .255 addresses: these address values have special use in the TCP/IP protocol. By default this box is unchecked. You may enable this feature if you have reason to believe that these addresses are in use by computers of interest for monitoring.
- Servers to add: these are the IP addresses (or computer names if they could be resolved) where servers/devices were detected, and which are not currently being monitored.
- Servers to ignore: These are servers/devices that were discovered, but which are already being monitored.
Pressing the OK button will append the list of servers on the left ("Servers to add") to the list of servers to run Smart Config on shown above.
Starting the process...
Pressing the green "Begin the Smart Config Process" button will send the server list and settings to the specified monitoring service (the Central Monitoring Service or a remote Satellite) for execution. When that happens, the following dialog is shown.

The dialog will display the progress of the Smart Config process. You can leave it open and watch or close it -- the process will continue in the background. The newly created server(s) and monitor(s) will automatically appear in the Console navigation panel a few moments after each one is created.

