 As most of you already know, Hyper-V is the virtualization product that is shipped with Windows Server Editions. Microsoft has continuously added new features it and has really enhanced its capabilities. With Windows Server 2012 Edition, Microsoft introduced multiple features that allows further configuration to your virtualization environment. In this article we will discuss about some of the new features introduced with this server Edition. Hyper-V can now be configured entirely using Powershell, the server now includes a Hyper-V module that contains a lot of new cmdlets. You can easily explore new commands by executing Get-Command –Module Hyper-V from Powershell. This article will not explain how to install and configure Hyper-V or how to deploy VMs, please check out this
 article to find out more on that.
Some of the new features introduced with Windows Server 2012 are:
Smart Paging – similar to paging in Windows Server, allows a machine to store some of its needed memory on the local disk. This feature is used when the VM is being restarted, when there is no available physical memory or when no extra memory can be allocated from the rest of the VMs. Let’s say you have a server that doesn’t have sufficient memory to reboot, Smart Paging will allocate the needed memory from its local disk drive. Hard drives are slower than physical memory so the restart procedure of a VM will take longer. Once the machine has been fully restarted, the used disk space will be freed.

Resource Metering – allows System Administrators to measure the amount of hardware resources consumed by a Virtual Machine. This technology was created to cover scenarios when the servers are hosted in a datacenter that taxes clients based on their consumption. You can configure this feature by using Powershell. You can view available cmdlets for Resource Metering by executing Get-Command *metering* -Module Hyper-V from Powershell:

Use these cmdlets to Enable/Disable/Reset resource metering. Use Measure-VM command to check out consumed resources since the resource metering was enabled.
You can also use the Get-VM command then pipe the output and store it in a variable to be able to write the result later.

Such scenario can happen when data is stored on local variables then sent to a center monitoring System for further analysis.
Dynamic Memory – deals with dynamic allocation of Hyper-V resources. Although this feature was first introduced with Windows Server 2008 R2 SP1, in Windows Server 2012 it offers a new configurable parameter, Minimum RAM memory. Dynamic Memory allows a Hyper-V host to distribute hardware specs between its Virtual Machines. With this technology enabled, a VM will automatically receive memory based on its requirements. For example, a VM will automatically receive extra memory on high loads, but its memory will also decrease when it’s not needed. Such scenario happens when the machine boots up because more memory is needed to power up a server then when is running. Dynamic Memory can be configured from the Memory section of a virtual machine:
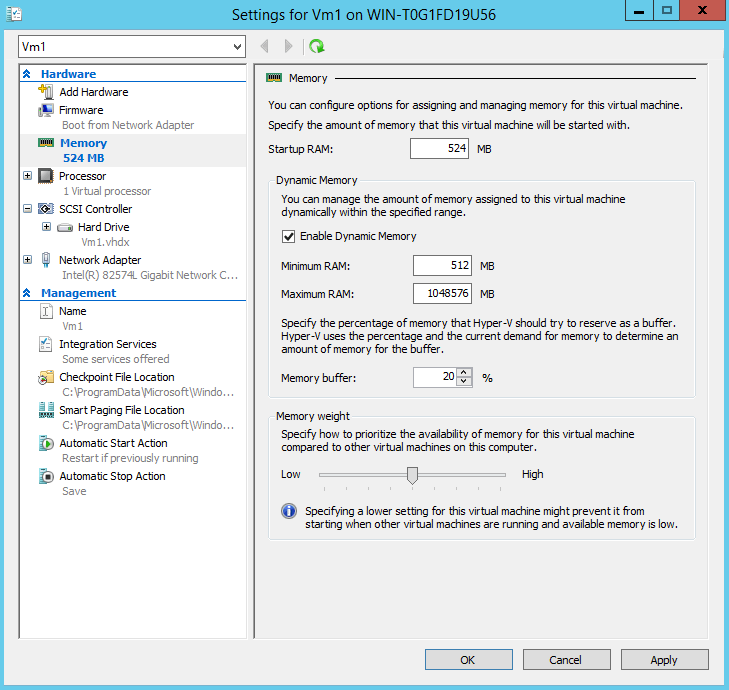
Note that you can configure Dynamic Memory only when the VM is stopped. There are several parameters that can be configured from this section. Although these parameters are pretty intuitive I will mention them here:
• Startup RAM: the amount of memory that will be allocated to the VM when it’s powered on.
• Minimum RAM: the minimum amount of memory that will be allocated to a VM when it’s running.
• Maximum RAM: maximum amount of memory allocated to a VB when it’s running
• Memory buffer: specifies the extra amount of memory (in percentage) that can be allocated to a machine in peak loads. If you have a VM with sporadic memory loads, you can configure memory buffer to ensure your machine handles the extra load.
• Memory Weight: this parameter offers a way to prioritize the availability of memory for a Virtual Machine. Note that a VM will higher memory weight will have priority in terms of memory allocation than a VM with a lower value.
NUMA topology – Non-Uniform Memory Access offers a way to improve system scalability of memory in servers with multiprocessors architecture without affecting the memory bus. With this technology enabled, a VM will know the underlying hardware of the physical hosts thus, memory allocation will be correctly configured. I don’t know much about this technology, but from what I’ve learn so far, NUMA does the following: NUMA divides memory and processors into groups called NUMA nodes. Parts of the memory are connected directly to system processors. A processor will always try to access memory that is part of its NUMA group because it’s accessed much faster. A memory that is part of the same NUMA group as a processor is known as local memory while memory located in another NUMA group is referred to as remote. In Windows Server 2012, a VM can use a maximum of 64 processors and 1 TB of memory. When a VM is started, Hyper-V will try to allocate its resources from a single NUMA group. If the VM’s requirements exceed the NUMA group capabilities, then the VM will receive the rest of its resources from another NUMA group. This memory allocation method in the context of NUMA is known as NUMA spanning. You can enable/disable Hyper-V NUMA spanning from the Settings section:
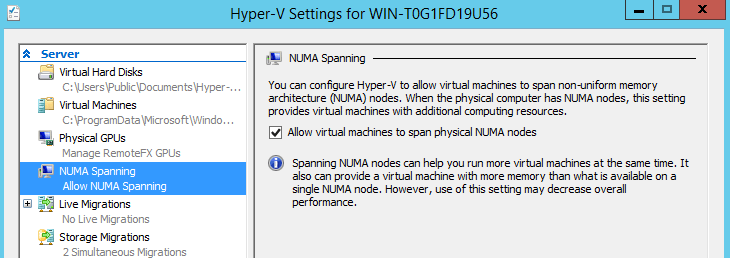
Hyper-V will present a virtual NUMA topology to its VMs. Hyper-V will create this topology based on the underlying physical architecture of the Hyper-V node.
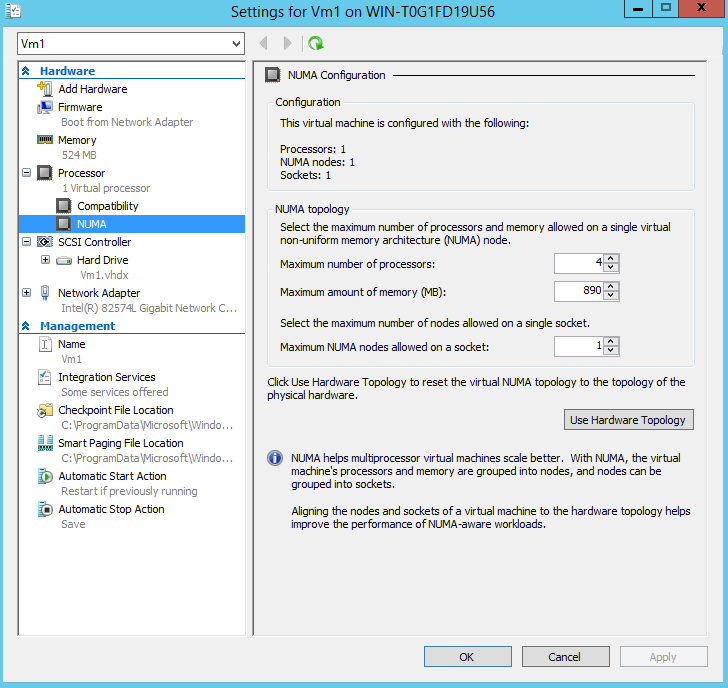
You can configure NUMA settings of a VM from the Processor section:
Virtual Fiber Channel – Windows server 2012 offers the possibility of creating virtual fiber channel from a Virtual Machine and then provision storage to it from your SAN from within the server. With this technology you can now take advantage of the already deployed Fiber Channel so your investments are not lost when connecting storage devices to virtual machines. The Virtual Fiber Channel for Hyper-V provides VM access to SAN LUNs by using a WWN (World Wide Name) that will be associated with a particular virtual machine. This new technology offers support for MPIO (Microsoft Multipath I/O), virtual SANs and live migrations.
To add a Virtual Fiber Channel to a VM, navigate to the Settings menu and click on Add Hardware, and select the Fiber Channel Adapter:
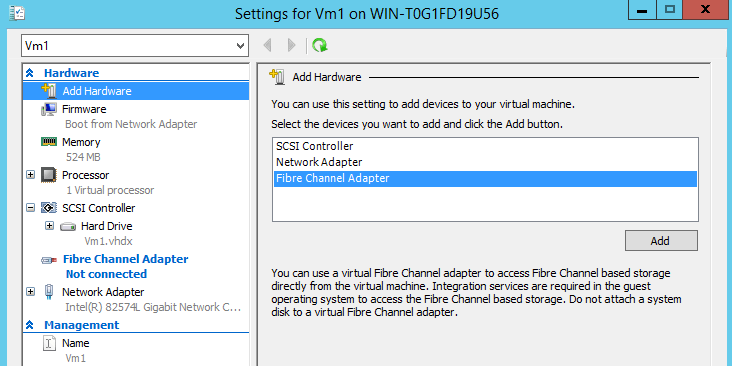
Once you’ve add the new virtual hardware, you’ll have to select the Virtual SAN. Note that the WWN can be manually configured if desired:

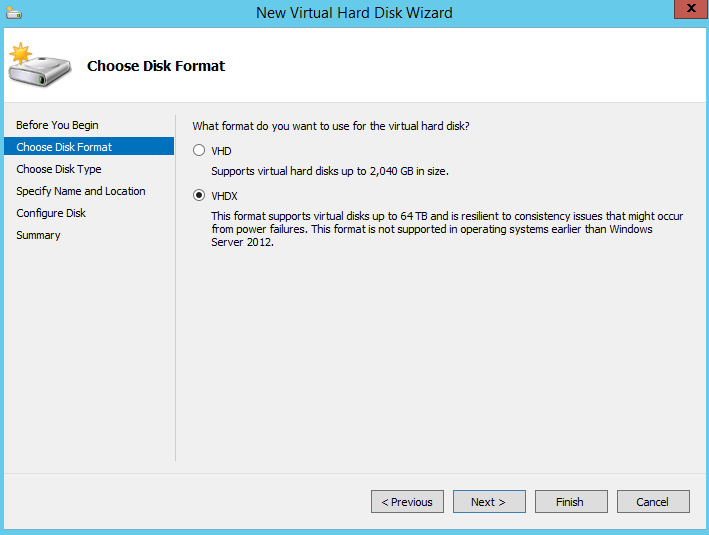
VHDX disks – is a new virtual hard disk (VHD) format that can support up to 64 TB of disk space. VHDX was created to replace its predecessor, VHD which supported a maximum of 2 TB in size. With Windows Server 2012 you can convert a VHD to a VHDX and vice versa. The disadvantage of using this new technology is the fact that is supported only by Windows Server 2012 and does not offer backward compatibility with previous Editions. VHDX offers a logging system that verifies VHDX metadata structures updates thus protecting the virtual disk against data corruption when power disruptions occur. It uses 4-KB logical sectors to provide increased performance for applications using this type of sectors.
System administrators can create VHDX using the Hyper-V interface or by using Powershell:
New-VHD –Path d:\NewDisk0.vhdx –BlockSizeBytes 128MB –LogicalSectorSize 4KB –SizeBytes 1TB
I’ve tried to present some of the new Hyper-V features introduced with Windows Server 2012. I’m sure there are more features that I’ve not included here, but these are the ones I’ve studied about so far. Personally I think that the improved Hyper-V version that ships with Server 2012 offers increased capabilities that can make your life as a System Administrator much easier. I hope you’ve enjoyed this article and don’t forget to post any questions you have in our comments section below. Wish you all the best and stay tuned for the following articles.